Pgvector to store vector embeddings computed by a data model
Table of contents
Preamble
Vector embeddings is the result of the conversion of any data (words, sentences, images, videos, documents…) into array of floating numbers (vectors) that capture their meaning or essence.
When your data are converted to vectors of N-dimensions you can then use them in multiple domain of AI:
- Retrieval-Augmented Generation (RAG)
- Image search
- Natural language processing (NLP)
- …
The small use case I wanted to implement is an image search one. Computing vector embeddings being a resource consuming process the result must be stored in a database for further queries… On PostgreSQL there is an open source extension called pgvector. Pgvector support multiple distance functions such as L2 distance, Cosine distance, L1 distance and so on with special new operators such as <->, <=> and <+>… Example query:
select *
from items
where id != 1
order by embedding <-> (select embedding from items where id = 1)
limit 5;
This vector embeddings subject is becoming quite popular and you find equivalence of pgvector in other database flavor like (non exhaustively):
- Oracle 23ai
- MariaDB 11.7.x
- SQL Server 2025
My programming language will (obviously) be Python (3.13) and I had first to decide which AI library to use between:
- PyTorch
- Scikit-learn
- TensorFlow
- Keras
- …
As you can imagine there are plenty of articles debating the differences and pros and cons of the different AI frameworks. At the end all the articles I have read discussing about converting images to vector using a pre-trained model were using Pytorch so by default this is the one I have started with. But I plan to try some test at the end of this blog post on a simple case using Scikit-learn and TensorFlow…
Then on Internet the recommended models to generate vectors are convolutional neural network (CNN) pre-trained models like VGG or ResNet. I plan to use a pre-trained model and do not plan to train one myself…
My database server is my Red Hat Enterprise Linux release 8.7 (Ootpa) box with 12 cores and 64GB of memory. PostgreSQL is release 17.2. My client is my Windows desktop with Miniconda (py312_24.11.1-0) and Python 3.13.1.
Pgvector installation and configuration
Pgvector installation on my test server is as easy as:
[root@server01 ~]# dnf install -y pgvector_17.x86_64
.
.
.
[root@server01 ~]# ll /usr/pgsql-17/lib/vector.so
-rwxr-xr-x 1 root root 189960 Nov  2 17:04 /usr/pgsql-17/lib/vector.so
To ease all the steps it is strongly suggested to set below in your postgres account profile (I use 5433 as a listening port). Do not, also, forget to modify pg_hba.conf to allow remote connection with your account:
PGDATA=/postgres/17/data
export PGDATA
alias psql="psql --port=5433"
alias pg_start="pg_ctl -D ${PGDATA} -l logfile start"
alias pg_restart="pg_ctl -D ${PGDATA} -l logfile restart"
alias pg_stop="pg_ctl -D ${PGDATA} -l logfile stop"
Then I create a database and an account for myself to remotely connect to the PostgreSQL database. I also activate the pgvector extension for my database:
postgres=# create role yjaquier with superuser login password 'secure_password';
CREATE ROLE
postgres=# create database yjaquier with owner yjaquier;
CREATE DATABASE
postgres=# \c yjaquier
You are now connected to database "yjaquier" as user "postgres".
yjaquier=# create schema vector;
CREATE SCHEMA
yjaquier=# create extension vector;
CREATE EXTENSION
yjaquier=# \dx
                             List of installed extensions
  Name   | Version |   Schema   |                     Description
---------+---------+------------+------------------------------------------------------
 plpgsql | 1.0     | pg_catalog | PL/pgSQL procedural language
 vector  | 0.8.0   | public     | vector data type and ivfflat and hnsw access methods
(2 rows)
I create a table with a vector column of 1000 dimensions which is exactly what ResNeXt model I plan to use is outputting:
yjaquier=# create table if not exists vector.pictures(id serial primary key, name varchar(50), embedding vector(1000));
CREATE TABLE
yjaquier=# create unique index if not exists pictures__name on vector.pictures(name);
CREATE INDEX
Choosing a free picture dataset
There is plenty of free to use picture datasets around like:
- Kaggle Cats and Dogs Dataset
- CIFAR-10 (Canadian Institute for Advanced Research, 10 classes)
- ImageNet
- MS COCO (Microsoft Common Objects in Context)
- CIFAR-100 (Canadian Institute for Advanced Research, 100 classes)
- MNIST (Modified National Institute of Standards and Technology database)
- CelebA (CelebFaces Attributes Dataset)
- CompCars
- Kaggle is also proposing lots of free dataset
- Open Images Dataset
The main problem is that most of these datasets are really big (> 10GB) and even with a fiber Internet connection (1Gb/s) they are located on slow, or limited, bandwidth web servers…
I could have chosen the Cats and Dogs dataset from Microsoft that is small, easy to use and fast to download but I have seen it used in so many blog post that I have finally chosen, for more fun, the CelebA dataset. I have chosen the align&crop dataset (img_align_celeba.zip). This dataset is more than 200,000 pictures of small size (few KB) and small in dimension (178 x 218 for most of them).
Miniconda setup
Disclaimer:
The Anaconda Term of Service has changed in 2020 and it is really complex to understand it. If I’m not wrong the products like Anaconda and Minconda (that I’m using) are still free of charge. But what is not free is the access to secure Anaconda repository. Versus the conda-forge repository where potentially an attacker could push malicious code in repositories…
Add the conda-forge channel. This is modifying .condarc file in the home of your (Windows) account:
$ conda config --add channels conda-forge
$ conda config --remove channels defaults
But when checking I still had other repositories:
$ conda config --show channels
channels:
  - conda-forge
  - https://repo.anaconda.com/pkgs/main
  - https://repo.anaconda.com/pkgs/r
  - https://repo.anaconda.com/pkgs/msys2
(base)
yjaquier@WINDOWS MINGW64 ~
$ conda config --show-sources
==> C:\ProgramData\miniconda3\.condarc <== channels: - https://repo.anaconda.com/pkgs/main - https://repo.anaconda.com/pkgs/r - https://repo.anaconda.com/pkgs/msys2 ==> C:\Users\yjaquier\.condarc <==
ssl_verify: False
proxy_servers:
  http: http://proxy_account:proxy_password@proxy_server:proxy_port
  https: http://proxy_account:proxy_password@proxy_server:proxy_port
channels:
  - conda-forge
So edited C:\ProgramData\miniconda3\.condarc and put everything in comment and now I got:
$ conda config --show-sources
==> C:\Users\yjaquier\.condarc <==
ssl_verify: False
proxy_servers:
  http: http://proxy_account:proxy_password@proxy_server:proxy_port
  https: http://proxy_account:proxy_password@proxy_server:proxy_port
channels:
  - conda-forge
So my .condarc file is made of (use simple quote, ‘ if your password has special character):
proxy_servers:
  http: 'http://proxy_account:proxy_password@proxy_server:proxy_port'
  https: 'http://proxy_account:proxy_password@proxy_server:proxy_port'

ssl_verify: false
channels:
  - conda-forge
Finally creating a new conda environment is as easy as (conda env remove -n “ai” to drop it):
conda create -n "ai" python=3.13
conda activate ai
This requirements.txt file:
torch
torchvision
torchaudio
numpy
pillow
psycopg[binary]
Flask
That I install with (if you want to use the CUDA capability of your GPU with PyTorch refer to the dedicated section and the special command to install it):
pip install -r requirements.txt
Vector embeddings computation and storage with pgvector
When PyTorch is downloading model I had this, usual, proxy error:
OSError: Tunnel connection failed: 407 Proxy Authentication Required
Add this Python code at the top of your script to configure your proxy server for urllib:
urllib.request.ProxyHandler({"https" : "proxy_server:proxy_port"})
urllib.request.ProxyBasicAuthHandler().add_password('realm', 'host',"proxy_user", "proxy_password")
I also had this certificate error:
urllib.error.URLError: <urlopen error [SSL: CERTIFICATE_VERIFY_FAILED] certificate verify failed: Basic Constraints of CA cert not marked critical (_ssl.c:1018)>
As we use ZScaler this is a classical one for me. Locate the Python certificate of your environment with below Python code:
>>> import os
>>> print(os.environ.get('SSL_CERT_FILE'))
C:\Users\yjaquier\.conda\envs\ai\Library\ssl\cacert.pem
Then add in this file your ZScaler certificates that you can extract from your web browser for any site you visit…
Then I have this Python code (vector_pytorch.py) that run on CPU for me, seeing performance I understand why GPU are more adapted to those tasks:
import torch
from torchvision import models, transforms
from PIL import Image
import urllib.request
import psycopg
import os
import datetime

# Downloading: "https://download.pytorch.org/models/resnext101_64x4d-173b62eb.pth" to C:\Users\yjaquier/.cache\torch\hub\checkpoints\resnext101_64x4d-173b62eb.pth
# OSError: Tunnel connection failed: 407 Proxy Authentication Required
# urllib.request.ProxyHandler({"https" : "proxy_host:proxy_port"})
# urllib.request.ProxyBasicAuthHandler().add_password('realm', 'host',"proxy_user", "proxy_password")
# urllib.error.URLError:
# print(os.environ['SSL_CERT_FILE'])

DIRECTORY = "c:/Development/python/vector/static/img_align_celeba"
TRUNCATE_TARGET_TABLE = 'yes'
BATCH_SIZE = 1000 # Adjust batch size to your available memory, inference is consuming quite a lot... I have 32GB on my PC

try:
  # Connect to an existing database
  connection = psycopg.connect(user="yjaquier", password="secure_password", host="server01.domain.com", port="5433", dbname="yjaquier")

  # Open a cursor to perform database operations
  cursor = connection.cursor()

  cursor.execute("select version()")
  row=cursor.fetchone()

  if not row:
    raise KeyError("No data found")

  print(row[0])

except psycopg.errors.Error as error:
  print("Error fetching data from PostgreSQL", error)
  exit(1)

# Truncating destination table if requested
if (TRUNCATE_TARGET_TABLE.lower() == "yes"):
  try:
    print("Truncating PostgreSQL vector table...")
    cursor.execute("truncate table vector.pictures restart identity")
    connection.commit() # A commit for a truncate ? Yes....
  except psycopg.errors.Error as error:
    print("Error truncating PostgreSQL vector table", error)
    exit(1)

# Refer to model documentation to understand what transformation you should apply to images
# https://pytorch.org/vision/stable/models/generated/torchvision.models.resnext101_64x4d.html#torchvision.models.resnext101_64x4d
preprocess = transforms.Compose([
  transforms.Resize(size = (224, 224)),
  transforms.ToTensor(),
  transforms.Normalize(mean = [0.485, 0.456, 0.406], std = [0.229, 0.224, 0.225]),
])

device = torch.device("cuda" if torch.cuda.is_available() else "cpu")
print("Vector Embeddings ccomputation will be on " + str(device))

print("Loading model...")
model = models.resnext101_64x4d(weights = models.ResNeXt101_64X4D_Weights.DEFAULT)
model.eval().to(device)

start_process = datetime.datetime.now()
print(f"Process starts at {start_process}")

# filenames = [f for f in os.listdir(DIRECTORY) if f.endswith('.jpg')][:10000]
filenames = [f for f in os.listdir(DIRECTORY) if f.endswith('.jpg')][:1000]
nb_filenames = len(filenames)
print(f"Found {nb_filenames} images in {DIRECTORY}...")

print(f"Preprocessing and computing embedding vectors of images by batch of {BATCH_SIZE} images...")
# filenames = [f for f in os.listdir(DIRECTORY) if f.endswith('.jpg')][:1]
# When doing [x:y] note that the item in y position 5 is NOT included
images = []
embeddings = []
START_BATCH = 0
END_BATCH = BATCH_SIZE
while START_BATCH < nb_filenames:
  for filename in filenames[START_BATCH:END_BATCH]:
    filename_with_directory = os.path.join(DIRECTORY, filename)
    picture = Image.open(filename_with_directory).convert("RGB")
    images.append(preprocess(picture))
  print(f"Preprocessed {END_BATCH}/{nb_filenames}...")
  # embeddings = model(images[START_BATCH:END_BATCH])
  # no gradients / computation graph will be tracked, saving memory
  # https://discuss.pytorch.org/t/releasing-memory-after-running-a-pytorch-model-inference/175654
  # Without torch.no_grad() the mmeory usage keeps increasing until blocking your PC and/or aborting the Python script
  with torch.no_grad():
    embeddings.extend(model(torch.stack(images).to(device)))
  print(f"Computed embeddings {END_BATCH}/{nb_filenames}...")
  images = []
  START_BATCH = END_BATCH
  END_BATCH += BATCH_SIZE

print("Saving embeddings in PostgreSQL(pgvector)...")
sql = "insert into vector.pictures (name, embedding) values (%s, %s)"
# I have tried with the more efficient COPY command but failed to make it working...
# Looks like it is not yet implemented, see https://github.com/pgvector/pgvector-python
# with cursor.copy("COPY vector.items (name, embedding) FROM STDIN") as copy:
i = 1
for filename, embedding in zip(filenames, embeddings):
  data = (filename, embedding.detach().numpy().tolist())
  cursor.execute(sql, data)
  if (i % BATCH_SIZE == 0):
    print(f"Processed {i}/{nb_filenames}...")
    connection.commit()
  i += 1

print("Committing changes and closing PostgreSQL connection...")
if connection:
  connection.commit()
  cursor.close()
  connection.close()
  print("PostgreSQL connection is closed \n")

end_process = datetime.datetime.now()
print(f"Process ends at {end_process}")
print(f"Process duration: {end_process - start_process}")
As it was really too slow on my Laptop I have also decided to use my PostgreSQL database server that is qui powerful (but still no GPU). On RedHat 8.7, Python 3.12 is the latest available version. No point of using Anaconda so created a Python virtual environment with:
[postgres@server01 ~]$ /usr/bin/python3.12 -m venv ai
.
.
[postgres@server01 ~]$ source ~/ai/bin/activate
(ai) [postgres@server01 ~]$
My first run with a too big BATCH_SIZE value has made a kernel panic and rebooted my server so decided to limit postgres Linux user memory usage to 32GB with:
[root@server01 ~]# cat /etc/security/limits.conf
.
.
.
postgres        hard    as      33554432
So now cannot over provisioned memory:
[postgres@server01 ~]$ ulimit -v
33554432
I have added on top of my Python script the python executable with -u option to force the stdout and stderr streams to be unbuffered:
[postgres@server01 ~]$ head vector_pytorch.py
#!/home/postgres/ai/bin/python -u
.
.
.
I have finally been able to process the 202,599 images in background with:
[postgres@server01 ~]$ nohup ./vector_pytorch.py > vector_pytorch.log 2>&1 &
The process has run for 5 hours 59 minutes and 44 seconds (including the PostgreSQL insertion), using around 40% of the 12 physical cores of my server…
Once the pictures vector embeddings are loaded you can start to perform your first pgvector query with something like the top five closest images from image 000001.jpg by cosine distance:
select name
from vector.pictures where name != '000001.jpg'
order by embedding <=> (select embedding from vector.pictures where name = '000001.jpg')
limit 5;
During my trials I have first loaded 10,000 pictures vector embeddings in my PostgreSQL database and queries went all fast. But once I loaded the 202,599 vector embeddings queries have started to slow down dramatically. I was at almost 2 seconds per my simple query to find the top 5 closest images:
yjaquier=# \timing
Timing is on.
yjaquier=# select name
yjaquier-# from vector.pictures where name != '000001.jpg'
yjaquier-# order by embedding <=> (select embedding from vector.pictures where name = '000001.jpg')
yjaquier-# limit 5;
    name
------------
 131731.jpg
 042544.jpg
 090262.jpg
 089301.jpg
 085646.jpg
(5 rows)

Time: 1658.897 ms (00:01.659)
Or with pgAdmin:

Is it possible to improve with an index ? Let’s try with an HNSW index, creation was really long (more than 5 minutes):
yjaquier=# create index pictures__embedding_hnsw on vector.pictures using hnsw(embedding vector_cosine_ops);
NOTICE:  hnsw graph no longer fits into maintenance_work_mem after 13439 tuples
DETAIL:  Building will take significantly more time.
HINT:  Increase maintenance_work_mem to speed up builds.
CREATE INDEX
But result is there (150-200 times faster):
yjaquier=# \timing
Timing is on.
yjaquier=# select name
yjaquier-# from vector.pictures where name != '000001.jpg'
yjaquier-# order by embedding <=> (select embedding from vector.pictures where name = '000001.jpg')
yjaquier-# limit 5;
    name
------------
 131731.jpg
 042544.jpg
 090262.jpg
 089301.jpg
 085646.jpg
(5 rows)

Time: 10.124 ms
Flask application to display retrieved pgvector similar images
Having the result in SQL is already a nice achievement but I wanted to go further and have a small web application to display pictures in a web browser. The de facto choice with Python is Flask !
For the image to be display in HTML you must have a similar file layout:
app.py
|-- static
|      favicon.ico (I have one with my face but this file is NOT mandatory)
|   |-- css
|      style.css
|   |-- js
|      main.js
|   |-- img_align_celeba
|      All pictures (I have tried using a symbolic link but does not work !)
|-- templates
|      index.html
App.py:
from flask import Flask, render_template, request
import psycopg
from flask import jsonify

app = Flask(__name__)

@app.route("/", methods=['GET', 'POST'])
def home():
  # if request.method == 'POST':
  #   # file = request.files['chosen_file']
  #   data = request.form.get("chosen_file")
  #   # print(data)
  #   # print(data['filename'])
  #   return render_template('index.html', chosen_file_image = data)
  return render_template('index.html')

@app.route("/data", methods=["POST"])
def get_data():
  data = request.get_json()
  # print(request.get_data())
  # print(data)
  # print(data['image_name'])
  image_name = data['image_name']
  # print(image_name)
  # exit(0)
  # render_template('index.html', chosen_file_image = image_name)
  if not image_name:
    return jsonify({"error": "No image name provided"}), 400
  connection = psycopg.connect(user="yjaquier", password="secure_password", host="server01.domain.com", port="5433", dbname="yjaquier")
  cursor = connection.cursor()
  # cursor.execute("select * from vector.pictures where name != '000001.jpg' order by embedding <-> (select embedding from vector.pictures where name = '000001.jpg') limit 5;")
  cursor.execute("select name from vector.pictures where name != %s order by embedding <=> (select embedding from vector.pictures where name = %s) limit 5;", (image_name, image_name))
  rows = cursor.fetchall()
  cursor.close()
  connection.close()
  return jsonify(rows)

if __name__ == '__main__':
    app.run(debug = True, port = 5000)
Style.css:
h1 {
  text-align: center;
}
Main.js:
document.getElementById("chosen_file").addEventListener("change", function(){
    // const filePath = document.getElementById("chosen_file").value;
    // const fileName = filePath.split('\\').pop().split('/').pop();
    // document.getElementById("chosen_file").src = '{{url_for(\'static\', filename=\'img_align_celeba/' + fileName + ')}}';
    document.getElementById("submit").disabled = false;
});

document.getElementById("submit").addEventListener("click", function(event){
    event.preventDefault()
    const filePath = document.getElementById("chosen_file").value;
    const fileName = filePath.split('\\').pop().split('/').pop();
    document.getElementById("chosen_image_file").getElementsByTagName('img')[0].src = '/static/img_align_celeba/' + fileName;
    document.getElementById("chosen_image_file").style.visibility = "visible";
    // alert(fileName);
    fetch('/data', {
      method: 'POST',
      headers: {
      'Content-Type': 'application/json'
      },
      body: JSON.stringify({ image_name: fileName })
    })
    .then(response => response.json())
    .then(data => {
      // console.log(data)
      if (data.length !== 0) {
        for (let i = 1; i <= 5; i++) { // console.log(data[i-1][1]); document.getElementById("similar_image_" + i).src = '/static/img_align_celeba/' + data[i-1][0]; } document.getElementById("similar_images").style.visibility = "visible"; } }) .catch(error => console.error('Error:', error));
});
Index.html:
Welcome to Flask image similarity finder
Chosen Image
Similar Images
Run the Flask application with (debug mode not mandatory once stable):
flask --app app.py --debug run
And access it in your preferred browser on http://localhost:5000. I have to say that the similar images found are quite amazing:

Pytorch with CUDA using your GPU
As it is super slow to preprocess and infer on CPU I wanted to try to use my GPU:
>>> import torch
>>> torch.cuda.is_available()
False
>>> torch.cuda.current_device()
Traceback (most recent call last):
  File "", line 1, in
    torch.cuda.current_device()
    ~~~~~~~~~~~~~~~~~~~~~~~~~^^
  File "C:\Users\yjaquier\.conda\envs\ai\Lib\site-packages\torch\cuda\__init__.py", line 971, in current_device
    _lazy_init()
    ~~~~~~~~~~^^
  File "C:\Users\yjaquier\.conda\envs\ai\Lib\site-packages\torch\cuda\__init__.py", line 310, in _lazy_init
    raise AssertionError("Torch not compiled with CUDA enabled")
AssertionError: Torch not compiled with CUDA enabled
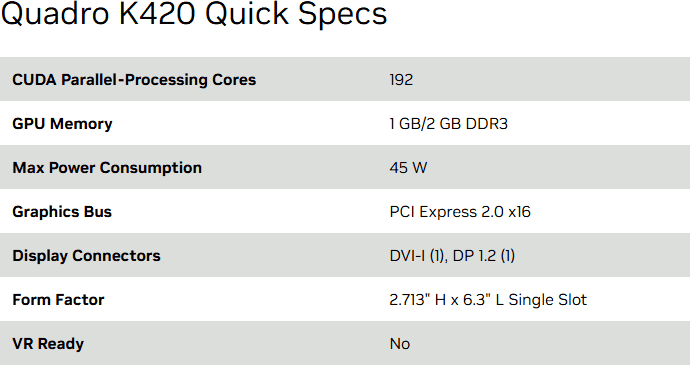
On my old Windows desktop I have a Quadro K420 that has, according to NVidia, 192 CUDA Parallel-Processing Cores:
pip uninstall torch torchvision torchaudio
pip install torch torchvision torchaudio --index-url https://download.pytorch.org/whl/cu126
>>> import torch
>>> torch.cuda.is_available()
C:\Users\yjaquier\.conda\envs\ai\Lib\site-packages\torch\cuda\__init__.py:129: UserWarning: CUDA initialization: The NVIDIA driver on your system is too old (found version 11040). Please update your GPU driver by downloading and installing a new version from the URL: http://www.nvidia.com/Download/index.aspx Alterna
tively, go to: https://pytorch.org to install a PyTorch version that has been compiled with your version of the CUDA driver. (Triggered internally at C:\actions-runner\_work\pytorch\pytorch\pytorch\c10\cuda\CUDAFunctions.cpp:109.)
  return torch._C._cuda_getDeviceCount() > 0
False
I already had the latest version of the HP site on my HP Desktop workstation. So I have decided to take a more recent one directly on NVidia web site. Version 475.14 was the latest one available for my K420 Quadra graphic card.
Unfortunately this did not solve my problem and still got the same error message… At least what the official NVidia driver bring versus the HP version is nvidia-smi tool:
PS C:\> nvidia-smi
Mon Feb 10 10:11:35 2025
+-----------------------------------------------------------------------------+
| NVIDIA-SMI 475.14       Driver Version: 475.14       CUDA Version: 11.4     |
|-------------------------------+----------------------+----------------------+
| GPU  Name            TCC/WDDM | Bus-Id        Disp.A | Volatile Uncorr. ECC |
| Fan  Temp  Perf  Pwr:Usage/Cap|         Memory-Usage | GPU-Util  Compute M. |
|                               |                      |               MIG M. |
|===============================+======================+======================|
|   0  Quadro K420        WDDM  | 00000000:02:00.0  On |                  N/A |
| 25%    0C    P0    N/A /  N/A |    862MiB /  1024MiB |      1%      Default |
|                               |                      |                  N/A |
+-------------------------------+----------------------+----------------------+
Problem is that the oldest Cuda version available with PyTorch is 11.8. I have seen a forum topic saying that 11.8 should work with 11.4 o gave a try:
pip uninstall torch torchvision torchaudio
pip3 install torch torchvision torchaudio --index-url https://download.pytorch.org/whl/cu118
And voilà:
>>> import torch
>>> torch.cuda.is_available()
True
But at the end I had another discomfiture:
>>> torch.cuda.current_device()
C:\Users\yjaquier\.conda\envs\ai\Lib\site-packages\torch\cuda\__init__.py:210: UserWarning:
    Found GPU0 Quadro K420 which is of cuda capability 3.0.
    PyTorch no longer supports this GPU because it is too old.
    The minimum cuda capability supported by this library is 3.7.

  warnings.warn(
0
So I personally had to give up but if you can afford using GPU on your PC then do it as most probably there is no competition versus a cpu…
If you are on Linux and have an AMD graphic card you can use ROCm that is the competitor of CUDA. Clearly CUDA is much more integrated everywhere and it is certainly why NVidia has killed the game (so far I hope)…
Latest update ! With the forced migration to Windows 11 I got a new desktop with a T400 4GB graphic card:
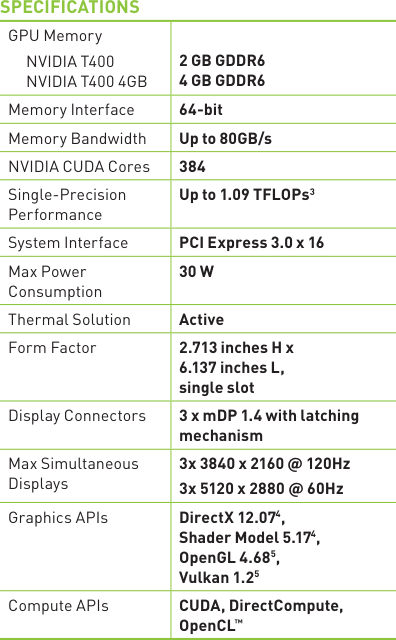
This T400 has now the correct Cuda version:
(base) PS C:\> nvidia-smi
Mon Mar 31 14:39:39 2025
+-----------------------------------------------------------------------------------------+
| NVIDIA-SMI 572.83                 Driver Version: 572.83         CUDA Version: 12.8     |
|-----------------------------------------+------------------------+----------------------+
| GPU  Name                  Driver-Model | Bus-Id          Disp.A | Volatile Uncorr. ECC |
| Fan  Temp   Perf          Pwr:Usage/Cap |           Memory-Usage | GPU-Util  Compute M. |
|                                         |                        |               MIG M. |
|=========================================+========================+======================|
|   0  NVIDIA T400 4GB              WDDM  |   00000000:47:00.0  On |                  N/A |
| 51%   64C    P0            N/A  /   31W |    3840MiB /   4096MiB |    100%      Default |
|                                         |                        |                  N/A |
+-----------------------------------------+------------------------+----------------------+
So I have installed PyTorch with the recommended command:
pip3 install torch torchvision torchaudio --index-url https://download.pytorch.org/whl/cu118
Instantly I saw it was way better:
$ python
Python 3.13.2 | packaged by conda-forge | (main, Feb 17 2025, 13:52:56) [MSC v.1942 64 bit (AMD64)] on win32
Type "help", "copyright", "credits" or "license" for more information.
>>> import torch
>>> torch.cuda.is_available()
True
>>> torch.cuda.current_device()
0
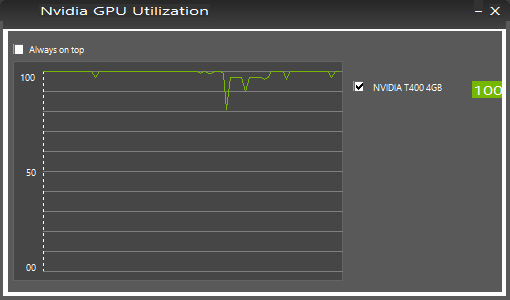
Due to limited memory available I had to do batch of 500 images, it used 100% of my GPU:
Got an error when saving to PostgreSQL:
  File "C:\vector_pytorch.py", line 97, in
    data = (filename, embedding.detach().numpy().tolist())
                      ~~~~~~~~~~~~~~~~~~~~~~~~^^
TypeError: can't convert cuda:0 device type tensor to numpy. Use Tensor.cpu() to copy the tensor to host memory first.
So I had to change this line of code:
data = (filename, embedding.cpu().detach().numpy().tolist())
The process run on my GPU (including the PostgreSQL insertion that is clearly not GPU oriented) for 6 hours 34 minutes and 55 seconds. This is a bit slower than on my very powerful test server but it’s a very low end graphic card.. So all in one it’s not that bad…
Other Python AI framework
TensorFlow
TensorFlow is not compatible with Python 3.13 so I had to recreate my environment with Python 3.12, once done installation is simply:
pip install tensorflow
And at the end TensorFlow is relying on Keras for the model part. Slightly different from PyTorch that has everything embedded:
import os
os.environ['TF_ENABLE_ONEDNN_OPTS'] = '0'
from tensorflow.keras.applications import ResNet50V2
from tensorflow.keras.applications.resnet_v2 import preprocess_input
from tensorflow.keras.preprocessing import image
import numpy as np

# requirements.txt
# tensorflow
# pillow

# Load the model pre-trained on ImageNet
model = ResNet50V2(weights='imagenet', include_top=False)

# Function to load and preprocess the image
def load_and_preprocess_image(img_path):
  img = image.load_img(img_path, target_size=(224, 224))
  img_array = image.img_to_array(img)
  img_array = np.expand_dims(img_array, axis=0)
  img_array = preprocess_input(img_array)
  return img_array

# Function to compute the vector embedding
def compute_vector_embedding(img_path):
  img_array = load_and_preprocess_image(img_path)
  features = model.predict(img_array)
  vector_embedding = features.flatten()
  return vector_embedding

# Example usage
img_path = 'c:/Development/python/vector/static/img_align_celeba/000001.jpg'
embedding = compute_vector_embedding(img_path)
print("Size of the vector embeddings: ", embedding.size)
print("First 1000 characters of vector embeddings: ", str(embedding.tolist())[:1000])
Scikit-learn
Scikit-learn is also not providing deep learning models or pretrained models like ResNet or VGG16. From wikipedia:
scikit-learn is a free and open-source machine learning library for the Python programming language. It features various classification, regression and clustering algorithms including support-vector machines, random forests, gradient boosting, k-means and DBSCAN, and is designed to interoperate with the Python numerical and scientific libraries NumPy and SciPy.
So to get a Resnet pretrained model I had to rely on Keras and so the code is similar to the one for TensorFlow even if the vector embeddings dimension is different:
import os
os.environ['TF_ENABLE_ONEDNN_OPTS'] = '0'
import numpy as np
from keras.applications import ResNet50V2
from tensorflow.keras.applications.resnet_v2 import preprocess_input
from keras.preprocessing import image
from sklearn.preprocessing import normalize

# Load the ResNet50 model pre-trained on ImageNet
model = ResNet50V2(weights='imagenet', include_top=False, pooling='avg')

def get_image_embedding(img_path):
  # Load the image file, resizing it to 224x224 pixels (required by ResNet50)
  img = image.load_img(img_path, target_size=(224, 224))
  # Convert the image to a numpy array
  img_array = image.img_to_array(img)
  # Expand dimensions to match the shape required by the model
  img_array = np.expand_dims(img_array, axis=0)
  # Preprocess the image array
  img_array = preprocess_input(img_array)

  # Get the embeddings from the model
  embeddings = model.predict(img_array)
  # Normalize the embeddings
  embeddings = normalize(embeddings)

  return embeddings

# Example usage
img_path = 'c:/Development/python/vector/static/img_align_celeba/000001.jpg'
embeddings = get_image_embedding(img_path)
print("Size of the vector embeddings: ", embeddings.size)
print("First 1000 characters of vector embeddings: ", str(embeddings.tolist())[:1000])
References
- Choosing Your Battle: TensorFlow vs. PyTorch vs. Scikit-learn
- Extract a feature vector for any image with PyTorch
- How to Get the Right Vector Embeddings
- Recommending Similar Images Using PyTorch
- Extracting rich embedding features from COCO pictures using PyTorch and ResNeXt-WSL
- A Beginner’s Guide to Vector Embeddings
- How to Build a Flask Python Web Application from Scratch
- Upload and Display Images On the Frontend Using Python Flask
- CatBench Vector Search Playground
About Post Author