DBX to develop locally and run remotely on Databricks. Working locally with your preferred IDE and running your code on Databricks has always been something I wanted to do. And I guess it is also a fair and logic request from many, not to say all, developers.
Until now I was using Databricks Connect but at the time of writing this blog post the product looks a bit outdated. I was happy with the tool until I wanted to move to Databricks Runtime 12.2 LTS and discovered there is no available version of Databricks Connect for this Databricks runtime:
dbx01
Also I have recently see a “annoying” limitation with it when trying to access DBFS files from an OS oriented library. Databricks is also clear on the future of Databricks Connect:
Databricks also supports a tool named Databricks Connect. However, Databricks recommends that you use either dbx or the Databricks extension for Visual Studio Code for local development instead of Databricks Connect.
My local development environment is made of:
Miniconda
Visual Studio Code
Git Bash that come with Git to have Linux shell taste on Windows
Databricks running on Azure
To overcome those limitations and move out from Databricks Connect you have two options:
Use Databricks extension for Visual Studio Code (it’s quite easy to make it working) but the solution is still not Globally Available and has not yet all the DBX feature. And as its name stand for it is only for Visual Studio Code so if using PyCharm or else…
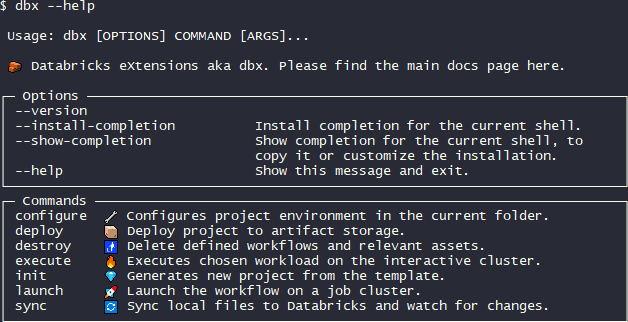
dbx by Databricks Labs open source tool for rapid development and integration with any development tool.
Not able to access DBFS files under Databricks Connect
For one of our project I had to read image files and extract the EXIF information (using piexif) and it was just not possible to test my code locally. As shown in this example code using glob as typical OS library:
importglobfrom pyspark.sqlimport SparkSession
from pyspark.dbutilsimport DBUtils
spark = SparkSession.builder.appName("Test").config("spark.sql.session.timeZone","UTC").getOrCreate()
dbutils=DBUtils(spark)print("DBFS access:")forfilein dbutils.fs.ls("/tmp"):
print(file)print("Local FS access:")forfileinglob.glob("d:\Temp\dbx*"):
print(file)print("DBFS access from OS library (NOT WORKING):")forfileinglob.glob("/dbfs/tmp/*"):
print(file)
import glob
from pyspark.sql import SparkSession
from pyspark.dbutils import DBUtilsspark = SparkSession.builder.appName("Test").config("spark.sql.session.timeZone", "UTC").getOrCreate()
dbutils=DBUtils(spark)print("DBFS access:")
for file in dbutils.fs.ls("/tmp"):
print(file)print("Local FS access:")
for file in glob.glob("d:\Temp\dbx*"):
print(file)print("DBFS access from OS library (NOT WORKING):")
for file in glob.glob("/dbfs/tmp/*"):
print(file)
The execution running on a Conda environment with Databricks Connect is not able to access DBFS files (I have also tried with dbfs:, same result). To do so you have to use the Databricks DBUtils package. But DBUtils cannot be used with typical OS packages like piexif in my case:
List the existing Conda environments you have with:
$ conda env list
# conda environments:#
base * C:\ProgramData\miniconda3
dbr11.3 C:\Users\username\.conda\envs\dbr11.3
$ conda env list
# conda environments:
#
base                  *  C:\ProgramData\miniconda3
dbr11.3                  C:\Users\username\.conda\envs\dbr11.3
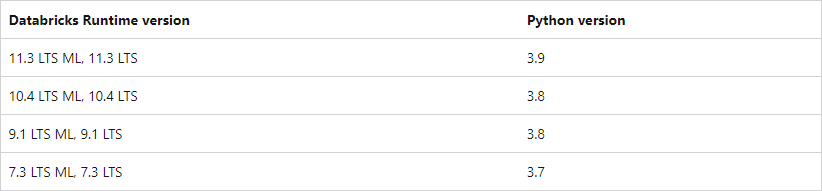
As we can see in the Databricks Runtime 12.2 LTS page this DBR is running with Python: 3.9.5. So I create a Conda environment with:
$ conda create --name dbr12.2 python=3.9.5
$ conda create --name dbr12.2 python=3.9.5
Switch to the newly created Conda environment with:
$ conda activate dbr12.2
$ conda activate dbr12.2
Databricks Runtime 12.2 is coming with Spark 3.3.2 so if developing PySpark add the exact same PySpark library with (obviously you might need much more regarding the code you plan to develop):
pip installpyspark==3.3.2
pip install pyspark==3.3.2
DBX installation and configuration
Databricks CLI installation
dbx is not a replacement of Databricks command-line interface (CLI) but extend it and is also based on it. So start by installing Databricks CLI:
pip install databricks-cli
pip install databricks-cli
Databricks CLI profile configuration
To configure access to your Databricks environment you have two available authentication methods. Either with a personal access token or with Azure AD token:
To generate a personal token go in User Settings (do not forget to copy it somewhere else as you will not be able to access it anymore):
dbx02
For Azure AD token:
$ databricks configure --profile uc3-work-aad --aad-token[ERROR] Set Environment Variable 'DATABRICKS_AAD_TOKEN' with your AAD Token and run again.
Commands to run to get your AAD token:
az logintoken_response=$(az account get-access-token --resource xxxxxxxx-xxxx-xxxx-xxxx-xxxxxxxxxxxx)exportDATABRICKS_AAD_TOKEN=$(jq .accessToken -r<<<"$token_response")
$ databricks configure --profile uc3-work-aad --aad-token
[ERROR] Set Environment Variable 'DATABRICKS_AAD_TOKEN' with your AAD Token and run again.Commands to run to get your AAD token:
az login
token_response=$(az account get-access-token --resource xxxxxxxx-xxxx-xxxx-xxxx-xxxxxxxxxxxx)
export DATABRICKS_AAD_TOKEN=$(jq .accessToken -r <<< "$token_response")
I did not want to spend too much time on configuring jq so simply did:
$ databricks configure --profile uc3-work-pat --token
Databricks Host (should begin with https://): https://adb-xxxxxxxxxxxxxx.azuredatabricks.net
Token:xxxxxxxxxxxxxxxxxxxxx
$ databricks configure --profile uc3-work-pat --token
Databricks Host (should begin with https://): https://adb-xxxxxxxxxxxxxx.azuredatabricks.net
Token:xxxxxxxxxxxxxxxxxxxxx
Once you have done one it is quite easy to edit and modify the c:\users\username\.databrickscfg file (username must be replaced by your Windows login)…
DBX installation
Install dbx with:
pip install dbx
pip install dbx
If when trying to execute a simple dbx –help you get:
$ dbx --help
Traceback (most recent call last):
File "C:\Users\username\.conda\envs\dbr12.2\lib\runpy.py", line 197, in _run_module_as_main
return _run_code(code, main_globals, None,
File "C:\Users\username\.conda\envs\dbr12.2\lib\runpy.py", line 87, in _run_code
exec(code, run_globals)
File "C:\Users\username\.conda\envs\dbr12.2\Scripts\dbx.exe\__main__.py", line 4, in<module>
File "C:\Users\username\.conda\envs\dbr12.2\lib\site-packages\dbx\cli.py", line 7, in<module>
from dbx.commands.deploy import deploy
File "C:\Users\username\.conda\envs\dbr12.2\lib\site-packages\dbx\commands\deploy.py", line 8, in<module>
from dbx.api.adjuster.adjuster import AdditionalLibrariesProvider, Adjuster
File "C:\Users\username\.conda\envs\dbr12.2\lib\site-packages\dbx\api\adjuster\adjuster.py", line 6, in<module>
from dbx.api.adjuster.mixins.existing_cluster import ExistingClusterAdjuster
File "C:\Users\username\.conda\envs\dbr12.2\lib\site-packages\dbx\api\adjuster\mixins\existing_cluster.py", line 8, in<module>
from dbx.models.workflow.v2dot0.workflow import Workflow as V2dot0Workflow
File "C:\Users\username\.conda\envs\dbr12.2\lib\site-packages\dbx\models\workflow\v2dot0\workflow.py", line 19, in<module>
class Workflow(WorkflowBase, TaskMixin, AccessControlMixin):
File "pydantic\main.py", line 197, in pydantic.main.ModelMetaclass.__new__
File "pydantic\fields.py", line 506, in pydantic.fields.ModelField.infer
File "pydantic\fields.py", line 436, in pydantic.fields.ModelField.__init__
File "pydantic\fields.py", line 552, in pydantic.fields.ModelField.prepare
File "pydantic\fields.py", line 668, in pydantic.fields.ModelField._type_analysis
File "C:\Users\username\.conda\envs\dbr12.2\lib\typing.py", line 835, in __subclasscheck__
return issubclass(cls, self.__origin__)
TypeError: issubclass() arg 1 must be a class
(dbr12.2)
$ dbx --help
Traceback (most recent call last):
  File "C:\Users\username\.conda\envs\dbr12.2\lib\runpy.py", line 197, in _run_module_as_main
    return _run_code(code, main_globals, None,
  File "C:\Users\username\.conda\envs\dbr12.2\lib\runpy.py", line 87, in _run_code
    exec(code, run_globals)
  File "C:\Users\username\.conda\envs\dbr12.2\Scripts\dbx.exe\__main__.py", line 4, in <module>
  File "C:\Users\username\.conda\envs\dbr12.2\lib\site-packages\dbx\cli.py", line 7, in <module>
    from dbx.commands.deploy import deploy
  File "C:\Users\username\.conda\envs\dbr12.2\lib\site-packages\dbx\commands\deploy.py", line 8, in <module>
    from dbx.api.adjuster.adjuster import AdditionalLibrariesProvider, Adjuster
  File "C:\Users\username\.conda\envs\dbr12.2\lib\site-packages\dbx\api\adjuster\adjuster.py", line 6, in <module>
    from dbx.api.adjuster.mixins.existing_cluster import ExistingClusterAdjuster
  File "C:\Users\username\.conda\envs\dbr12.2\lib\site-packages\dbx\api\adjuster\mixins\existing_cluster.py", line 8, in <module>
    from dbx.models.workflow.v2dot0.workflow import Workflow as V2dot0Workflow
  File "C:\Users\username\.conda\envs\dbr12.2\lib\site-packages\dbx\models\workflow\v2dot0\workflow.py", line 19, in <module>
    class Workflow(WorkflowBase, TaskMixin, AccessControlMixin):
  File "pydantic\main.py", line 197, in pydantic.main.ModelMetaclass.__new__
  File "pydantic\fields.py", line 506, in pydantic.fields.ModelField.infer
  File "pydantic\fields.py", line 436, in pydantic.fields.ModelField.__init__
  File "pydantic\fields.py", line 552, in pydantic.fields.ModelField.prepare
  File "pydantic\fields.py", line 668, in pydantic.fields.ModelField._type_analysis
  File "C:\Users\username\.conda\envs\dbr12.2\lib\typing.py", line 835, in __subclasscheck__
    return issubclass(cls, self.__origin__)
TypeError: issubclass() arg 1 must be a class
(dbr12.2)
In the conf directory of your project create a deployment.yaml (or .yml) file (there is a template called deployment.yml that you should rename or it will be taken) with something like:
Remark: It is also completely fine to just create a conf directory and create from scratch a deployment.yaml file if you don’t want all the other template files dbx init is creating…
You can configure the environment and profile name with:
$ dbx configure --profile uc3-work-pat --environment uc3-work-pat
[dbx][2023-04-06 14:50:42.124] Configuring new environment with name uc3-work-pat
[dbx][2023-04-06 14:50:42.165] Environment configuration successfully finished
$ dbx configure --profile uc3-work-pat --environment uc3-work-pat
[dbx][2023-04-06 14:50:42.124] Configuring new environment with name uc3-work-pat
[dbx][2023-04-06 14:50:42.165] Environment configuration successfully finished
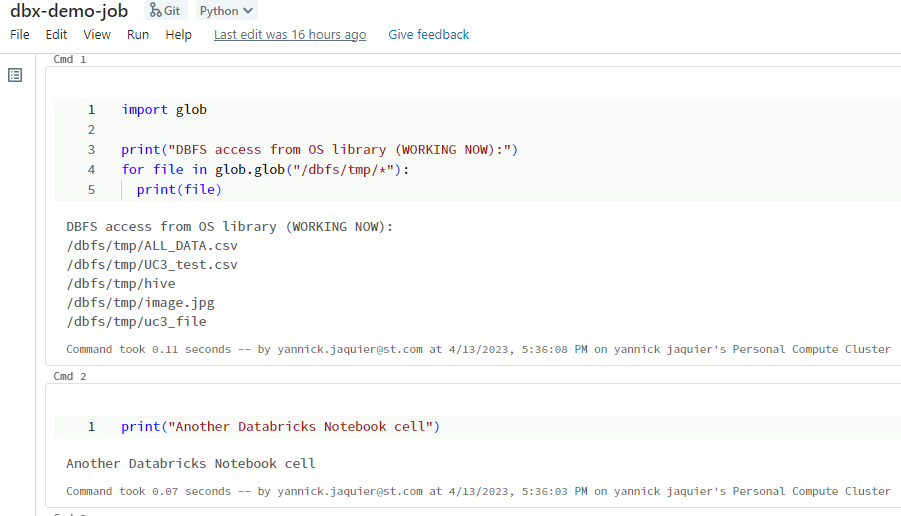
In the root of my project I create a dbx-demo-job.py with below simple source Python:
importglobprint("DBFS access from OS library (WORKING NOW):")forfileinglob.glob("/dbfs/tmp/*"):
print(file)
import globprint("DBFS access from OS library (WORKING NOW):")
for file in glob.glob("/dbfs/tmp/*"):
print(file)
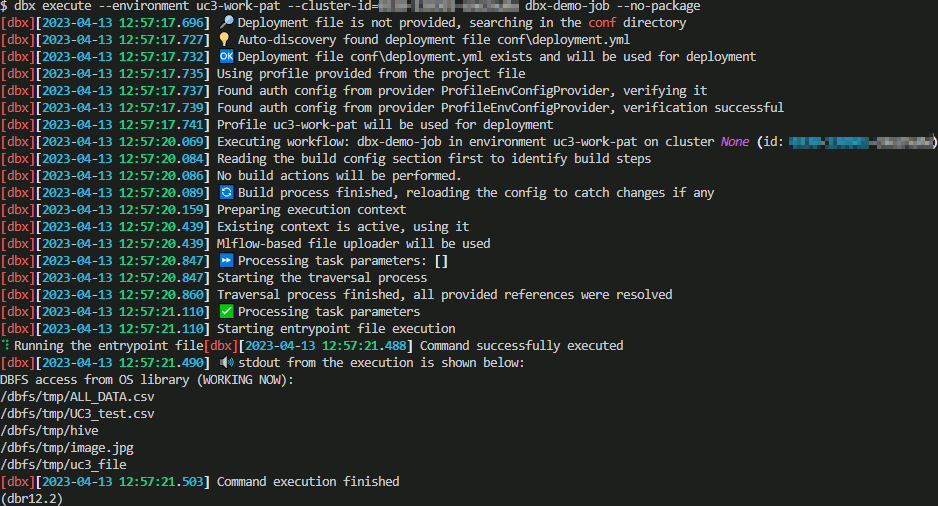
DBX execution
Execute your project on a cluster where the cluster id can be taken from the web URL when you are on the Databricks web page on your cluster. Then to execute it use below command that I executed with bash Visual Studio Code terminal:
dbx03
And yes I correctly get the DBFS files !
Strangely executing this command is NOT working in Git Bash but working from the bash terminal of VSCode (which is in fact the same terminal..):
UnicodeEncodeError: 'charmap' codec can't encode character '\U0001f9f1' in
position 0: character maps to <undefined>
UnicodeEncodeError: 'charmap' codec can't encode character '\U0001f9f1' in
position 0: character maps to <undefined>
Failing for an Unicode display error…
Investigating a bit further, executing this command with another bash executable present in Git directory (yes there is another bash executable in Git folder):
"C:\Program Files\Git\bin\bash.exe"--login-i
"C:\Program Files\Git\bin\bash.exe" --login -i
I have been able to execute my code, same as in Visual Studio Code Terminal, but the icons do not appear…
Resolve unicode error and add icons to Git Bash
There are plenty of web page dealing with this unicode issue and at a point in time I even thought it was a Windows Unicode issue. The Unicode error can be solved by the below simple export (that you can add to your .bash_profile):
exportPYTHONUTF8=1
export PYTHONUTF8=1
But the icons are still not that beautiful than with VSCode bash terminal (but at least it is usable):
dbx04
To add the icons you have to add them with a script that will extract them from two HTML pages, this is explained here or directly in the Mintty GitHub help pages.
To avoid annoying proxy issues I have downloaded the two HTML files locally and executed the script:
$ pwd/d/Download/emojis
$ ll
total 69656-rw-r--r--1 username 104908935476732 Apr 617:07 full-emoji-list.html
-rw-r--r--1 username 104908935836450 Apr 617:07 full-emoji-modifiers.html
-rwxr-xr-x1 username 10490895682 Apr 617:06 getemojis*
$ ./getemojis .
Using Full Emoji List, v15.0
Warning: this may take a while on Cygwin
Extracting 3664 emojis
emoji 1f600 (0%)
emoji 1f603 (0%)
emoji 1f604 (0%)
.
.
$ pwd
/d/Download/emojis$ ll
total 69656
-rw-r--r-- 1 username 1049089 35476732 Apr 6 17:07 full-emoji-list.html
-rw-r--r-- 1 username 1049089 35836450 Apr 6 17:07 full-emoji-modifiers.html
-rwxr-xr-x 1 username 1049089 5682 Apr 6 17:06 getemojis*$ ./getemojis .
Using Full Emoji List, v15.0
Warning: this may take a while on Cygwin
Extracting 3664 emojis
emoji 1f600 (0%)
emoji 1f603 (0%)
emoji 1f604 (0%)
.
.
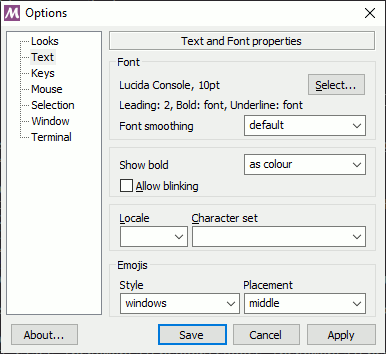
Then as explained in shared references change the Mintty configuration in your Git Bash window (top and left menu and choose Options). Then in appearing configuration window choose Text:
dbx05
And even without restarting your terminal the icons appear:
dbx06
DBX execution of a more complex example
If you project is a bit more complex with parameters and custom modules you would like to import, like librairies you created to factor your code. Your project structure might be something like:
The dbx-demo-package is the root folder created by dbx init where inside you have the conf and .dbx subfolders. All my source code is in my_module subfolder with its own hierarchical bunch of directories. My main file to execute is my_module/job/__main__.py as described in deployment.yaml:
python_file: "file://my_module/jobs/__main__.py"
python_file: "file://my_module/jobs/__main__.py"
In this __main__.py file I have below Python code to import logger, spark session and the arguments:
from my_module.config.configimport logger, spark, args
from my_module.config.config import logger, spark, args
Remark: If your editor is not able to resolve the import you might have to play with PYTHONPATH variable…
If you execute your code with (remove the –no-package flag as this time we have home made package):
FileNotFoundError: Project package was not found. Please check that /dist
FileNotFoundError: Project package was not found. Please check that /dist
So you have to create a wheel file with a setup script like (command to execute is something like python setup.py bdist_wheel for the binary wheel generation only):
from setuptools import setup, find_packages
from my_module import __version__, __author__
setup(
name='iic',
version=__version__,# author=__author__,
author="Yannick Jaquier",# url='',
author_email='yanjaq@domain.com',
description='My super exiting module',# long_description='My test wheel long description',
packages=find_packages(exclude=["tests","*.tests","*.tests.*","tests.*"]),
entry_points={'jobs': ['main=my_module.jobs.__main__:main']},
install_requires=['setuptools'])
parser.add_argument('--argument1',type=str, required=True,help="Mandatory first argument of type string")
parser.add_argument('--argument1', type=str, required=True, help="Mandatory first argument of type string")
The execution should fail for (not really self explanatory):
An exception has occurred, use %tb to see the full traceback.

SystemExit: 2
An exception has occurred, use %tb to see the full traceback.SystemExit: 2
This occur when you have not specified the required parameters. You can specify them either by adding in deployment.yaml file right below python_file parameter:
Hopefully your execution should be successful this time…
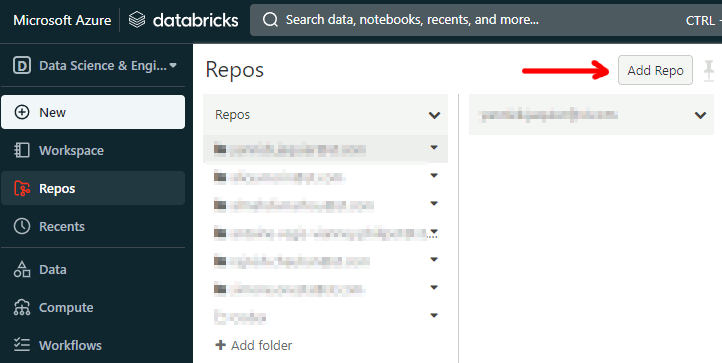
Synchronize your local code with Databricks
You can synchronize your local development on your Databricks environment, again with the idea to develop locally and execute on your Databricks cluster. Create the repository first with the Databricks web site:
dbx07
Then specify a name for your Databricks repository:
dbx08
Then you should be able to synchronize with something like (dbx is the repository name I have chosen). The command does not exit and keep file in sync till you press CTRL+C:


 installation and usage")


