JSON Web Token (JWT) ! I have always wanted to understand how it works and how to implement it to avoid going over and over onto the backend database to validate user/password.
My small demonstration application is made of those components:
A backend FastAPI written in Python to handle all the REST API endpoints to authenticate users, generate JWT tokens, and manage user sessions. optionally handling the todo list part.
A frontend Vue.js application to interact with the backend API and display the user interface.
A MariaDB database to store user information and todos. What’s super important is to NOT store password in clear text, for this I will use default hashlib of Python to store a hash version of the passwords.
1. The client access to the /login endpoint supplying in its http body the username and password
2. The application server hash the password and check with the database server if the username exists and if the hash version of the password match
3. If username is in the database the database server return the id, firstname and lastname of the user
4. The application server use the id, firstname, lastname and username payload to create the JWT that is returned to the client and stored with localStorage.setItem (you can see it with your preferred browser and its development console). This JWT can also be stored in a cookie
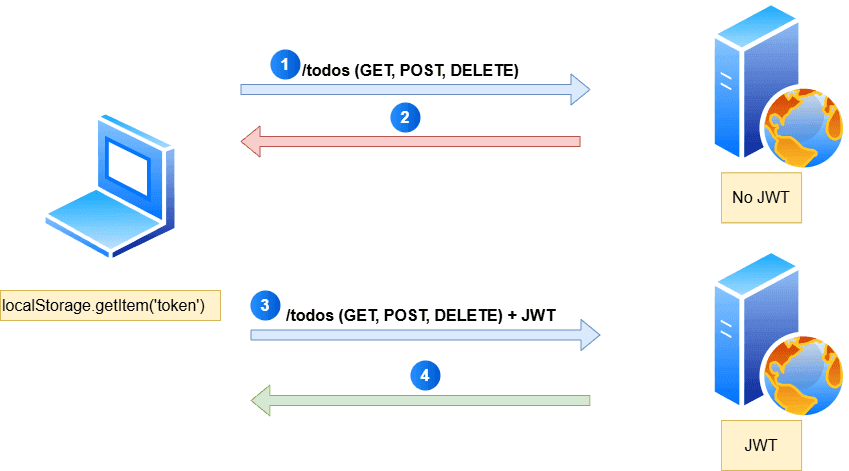
When a client request a protected endpoint:
1. The client access to a protected endpoint without a valid JWT or an expired JWT
2. You receive an HTTP error stating you are not authenticated
3. The client access to a protected endpoint with a valid JWT
4. You receive the response from the application server
jwt02
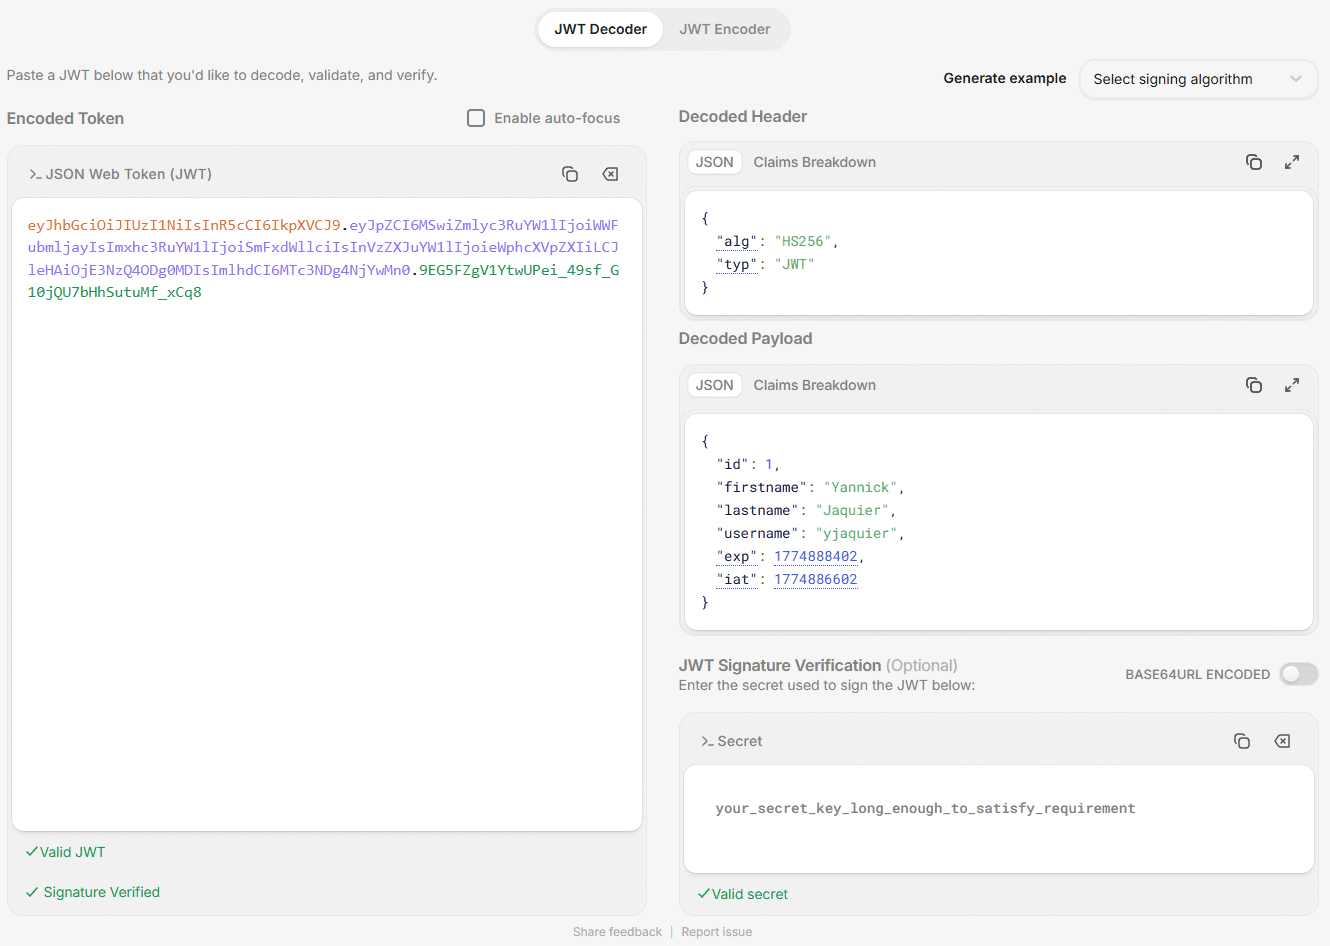
You can visualize your JWT with Chrome in Developer tools for my trial application:
jwt03
A JWT in in the form of three parts separated by a dot:
What is super interesting with the JWT technology is:
You don’t have to go each time to the database server to check the username and password, more efficient and less burden on your database server (even if you do redis). Any client with an already valid JWT can access protected resources without revalidation.
If you have a load balancer and multiple application server the JWT technology scale very well as each application server with the secret key can decode the JWT generated by any other application server (stateless application servers).
MariaDB
As a database I’m using the MariaDB database that come with XAMPP even if it is an old 1.4 release for what I need it will perfectly does the job ! I create a dedicated database and a dedicated user:
MariaDB [(none)]> create database jwt character set utf8mb4 collate utf8mb4_general_ci;
Query OK, 1 row affected (0.003 sec)

MariaDB [(none)]> create user jwt@'%' identified by 'secure_password';
Query OK, 0 rows affected (0.020 sec)

MariaDB [(none)]> grant all on jwt.* to jwt@'%';
Query OK, 0 rows affected (0.019 sec)
Then I create a users table to store my users with a primary key, id, as an autoincrement column. I also add a unique key on username as you cannot have duplicate username:
use jwt;

create table users (
  id int not null auto_increment,
  firstname varchar(30) not null,
  lastname varchar(30) not null,
  username varchar(30) not null,
  password varchar(100) not null, # Enough to store hash passwords
  primary key (id),
  unique index users_idx_username (username)
)
collate='utf8mb4_general_ci'
engine=innodb;
This step is optional but if you want to go till the classical Todo list pages you will also need this todos table:
use jwt;

create table todos (
  id int not null,
  users_id int not null,
  item varchar(100) not null,
  primary key (id, users_id)
)
collate='utf8mb4_general_ci'
engine=innodb;
Python backend (FastAPI)
I use Miniforge (watch out Conda and MiniConda repository are not free anymore and installing those could configure the paid repository by default) and have this environment.yml. You can also use venv or uv:
name: jwt
dependencies:
  - python=3.14
And I create the environment with (using Git Bash to ease my life):
And this requirements.txt file (pip install -r requirements.txt):
fastapi[standard]
pyjwt
pydantic
mariadb
Remark:
There are plenty of JWT implementation on Internet. I have chosen pyjwt as it is the first one to be suggested, for Python, on jwt.io web site.
Run the main.py file located in fastapi folder with something like. So all your call to this Rest API will be on port 8181 and in http. In production, particularly when transferring password, https is a must !:
fastapi dev --port 8181
To see the documentation of your FastAPI endpoints you can go to http://localhost:8181/docs. From this page you can also try them interactively !
If you are looking for a good HTTP return code check the Wikipedia page for a complete list.
There are plenty of good starter example in official FastAPI documentation, this one on JWT is a good starting point…
What do we have in this file ?
Home page
This is the / API endpoint accessible with POST method and this function, if you are authenticated, decode the JWT and return the full name of the user (concatenation of firstname and lastname).
Login page
This is the /login API endpoint accessible with POST method you supply username and password and if the username and hashed supplied password match the one in the database the function return a JWT. In this JWT I encode (base64) a bunch of information. Some fields are part of the standard like iat and exp:
The id of the user
The firstname of the user
The lastname of the user
The username of the user
The creation time of the JWT (iat). In Unix EPOCH format
The expiration period of the JWT (exp). In Unix EPOCH format
Register page
If you have no login then you need a way to request a new account. This is the /register API endpoint accessible with POST method where you supply your firstname, lastname, username, and password. If the username is not already taken, the function will create a new username and store your supplied password hashed with default hashlib Python function.
Vue.js frontend
As I am behind a corporate proxy, I need to set the following environment variable to bypass SSL verification (SELF_SIGNED_CERT_IN_CHAIN: view request failed to send):
$env:NODE_TLS_REJECT_UNAUTHORIZED=0
Create a Vuejs skeleton application, select only Vue Router (if you add more there is no harm) and the new composition API of course, with. I have decided to use bun due to its increasing popularity and how fast this tool can be versus npm or even pnpm:
bun create vue@latest
To be able to do a bit of SASS (SCSS) I add its support with:
bun add --dev sass-embedded
And to be able to display icons, for the eye along the password to make it visible or not, I add FontAwesome (free version):
bun add --dev @fortawesome/vue-fontawesome@latest-3
bun add @fortawesome/fontawesome-svg-core
bun add @fortawesome/free-solid-svg-icons
bun add @fortawesome/free-regular-svg-icons
bun add @fortawesome/free-brands-svg-icons
This is the HomePage.vue component. We fetch (POST) the / API endpoint and if we get a positive answer we display that the user is authenticated and its full name. This is where we use localStorage.getItem to get the JWT if existing. Or we propose to login or register.
Login page
This is the LoginUser.vue component. We fetch (POST) the /login API endpoint and if the provided username and password match an existing database user we get a positive answer we store the JWT (localStorage.setItem) and redirect the user to the home page.
Register page
This is the RegisterUser.vue component. We fetch (POST) the /register API endpoint. Interface allows you to supply firstname, lastname, username, and password. If the database is able to store the username (no duplicate possible on username column) then you are redirected to login page.
Todo list implementation
This part is a bonus of the original application. Because by just displaying the fullname of the connected user we have already demonstrated everything but all videos and articles on Internet are going with a todo list. So as a nice exercise I have also tried to implement it. You gonna see the same endpoint serving GET and POST methods and doing different things as well as the DELETE method implement to delete an item of the todo list.
The FastAPI script has three new endpoints for handling the todo list:
/todos (GET) to retrieve, if authenticated, the list of todos for the connected user
/todos (POST) to create, if authenticated, a new todo item for the connected user. The insert SQL is a bit complex because I take the max of the todos id for current user and increment it by 1.
/todos/{todo_id} (DELETE) to delete, if authenticated, a specific todo item by its ID for the connected user. This is the red cross icon in the todo list if you already have some.
For the Vuejs frontend this is all made with TodoList.vue component. Not very complex as we just have to use fetch method to call the correct endpoint and supply each time the correct information. You will see that after each insertion or deletion I fetch again all the todo for the current user, clearly we can (and must) do much better by updating the reactive variables directly.
To go further…
There are plenty of articles where you will see that they make a difference between the access token and the refresh token. The philosophy is to generate an access token with a small expire period (15 minutes for example) and at same time a refresh token with a longer expire period (till few days or a week for example). And when the application discover that the access token has expired it will use the refresh token to transparently re-generate a new access token and a new refresh token.
If the argument is not to transfer a lasting too long access token I understand the principle but then you would need to also transfer with all your requests to your Rest API endpoints this refresh token that last much longer. Means you need extra caution here and not transfer it the same way you do with your access token. The only viable option IMHO is to store this refresh token on the server only and avoid having transiting over the network. But this looks complex to implement…
Another (strongly suggested) option is to store this refresh token in a httpOnly cookie (to avoid XSS injection) and send it with each Rest API call (credentials: “include”).
The idea is to still generate the same access token but adding a new field “type” to make clear it is an access token:
{
  "id": user_id,
  "firstname": firtname,
  "lastname": lastname,
  "username": form_data.username,
  "type": "access", # Custom claim that is almost standard
  "iat": datetime.now(timezone.utc),
  "exp": datetime.now(timezone.utc) + timedelta(minutes = 2)
}
And a refresh token like, with less information:
{
  "id": user_id,
  "type": "refresh", # Custom claim that is almost standard
  "exp": datetime.now(timezone.utc) + timedelta(days = 7)
}
In you application you need a new endpoint /refresh (POST) that refresh the access token and the refresh token if the refresh token is still valid:
class RefreshRequest(BaseModel):
  refresh_token: str

class RefreshResponse(BaseModel):
  access_token: str
  refresh_token: str | None = None  # optional if you do rotation
  token_type: str = "bearer"

@app.post("/refresh", response_model = RefreshResponse)
async def refresh(payload: RefreshRequest):
  try:
    decoded = jwt.decode(jwt = payload.refresh_token, key = SECRET_KEY, algorithms = [ALGORITHM])
  except ExpiredSignatureError:
    raise HTTPException(status_code = status.HTTP_401_UNAUTHORIZED, detail = "Refresh token expired")
  except InvalidTokenError:
    raise HTTPException(status_code = status.HTTP_401_UNAUTHORIZED, detail = "Invalid refresh token")

  if decoded.get("type") != "refresh":
    raise HTTPException(status_code = status.HTTP_400_BAD_REQUEST, detail = "Invalid token type")

  username = decoded["sub"]

  # (Optional) check that token is still valid in DB / not revoked

  new_access = create_access_token(sub = username)

  # Optional rotation: issue a new refresh token too
  new_refresh = create_refresh_token(sub = username)

  return RefreshResponse(access_token = new_access, refresh_token = new_refresh)
You would also need to modify /login endpoint to return an access token and a refresh token. Then in each protected endpoints of your application in case the access token has expired you must automatically (on behalf of user) call the /refresh endpoint and get a new access token (and refresh token) that should be returned to user for storage in a httpOnly cookie of the browser (localStorage.setItem(‘access_token’, data.access_token) and refresh_token in a httpOnly cookie).