After an interesting testing of pgvector and the usage of pre-trained ResNeXt-101 64x4d model I wanted to try to train my own model on my dataset. And this time instead of using pgvector I wanted to store my embeddings in MariaDB as the vector datatype is available since MariaDB 11.4 (https://mariadb.com/docs/server/reference/sql-structure/vectors/vector-overview).
Disclaimer:
I’m no expert in this domain and I keep learning so do not hesitate to point me to mistakes or improvements.
Most of the articles and videos I have seen on the subject were all starting with a dataset of images that got labelled by human beings (like ReNet or ResNeXt) which is clearly not what I have. My 200,000 celebrity images are all in the same folder. I thought what I intended to do was not possible till I found articles and videos about unsupervised or self-supervised learning.
If you want to train your own model to generate embeddings without labels, you’ll need to use unsupervised or self-supervised learning. The most common approaches are:
Autoencoders
SimCLR (Simple Framework for Contrastive Learning of Visual Representations).
BYOL (Bootstrap Your Own Latent) for Self-Supervised Learning without labels.
My testing has been done with MariaDB 11.8.4 running on my RedHat 8.10 server. My server has 12 cores and 64 GB of RAM. My Python version is 3.13.9. MariaDB Python Connector is 3.4.7.
Miniconda and Linux setup
I have prepared my Windows desktop for development and rapid prototyping as well as my test server as those processes are taking quite a long time on CPU and this test server in a computer room is always powered on obviously.
On Windows I use MiniConda with conda forge repository (the default one from Anaconda is no more free). I plan to transition to Miniforge soon. And use this environment.yml file to create an environment:
name: ai
dependencies:
  - python=3.13
Create an ai environment with:
conda env create --file='C:\Users\yjaquier\environment.yml'
conda activate ai
If Linux I use uv that gives a lot of flexibility in Python version choice (On RedHat 8 only Python 3.9 is available by default):
[python@server01 ~]$ export https_proxy='http://proxy_account:proxy_password@proxy_host:proxy_port'
[python@server01 ~]$ pip3.9 install uv
Defaulting to user installation because normal site-packages is not writeable
Collecting uv
  Downloading uv-0.9.5-py3-none-manylinux_2_17_x86_64.manylinux2014_x86_64.whl (21.3 MB)
     |████████████████████████████████| 21.3 MB 6.6 MB/s
Installing collected packages: uv
Successfully installed uv-0.9.5
[python@server01 ~]$ uv venv --python 3.13 ai
Using CPython 3.13.9
Creating virtual environment at: ai
Activate with: source ai/bin/activate
[python@server01 ~]$ source ai/bin/activate
(ai) [python@server01 ~]$ python -V
Python 3.13.9
My additionnal requirements are in this requirements.txt file (pip install -r requirements.txt):
flask
mariadb
tqdm
Flask is for the small web application, mariadb is the MariaDB Python Connector and tqdm is for the progress bar.
On Windows it simply work with a pip install mariadb while on Linux I got this error:
(ai) [python@server01 ~]$ uv pip install mariadb
Using Python 3.13.9 environment at: ai
Resolved 2 packages in 225ms
  × Failed to build `mariadb==1.1.14`
  ├─▶ The build backend returned an error
  ╰─▶ Call to `setuptools.build_meta:__legacy__.build_wheel` failed (exit status: 1)

      [stderr]
      /bin/sh: mariadb_config: command not found
      Traceback (most recent call last):
        File "", line 14, in
          requires = get_requires_for_build({})
        File "/home/python/.cache/uv/builds-v0/.tmpcmYTmQ/lib/python3.13/site-packages/setuptools/build_meta.py", line 331, in get_requires_for_build_wheel
          return self._get_build_requires(config_settings, requirements=[])
                 ~~~~~~~~~~~~~~~~~~~~~~~~^^^^^^^^^^^^^^^^^^^^^^^^^^^^^^^^^^
        File "/home/python/.cache/uv/builds-v0/.tmpcmYTmQ/lib/python3.13/site-packages/setuptools/build_meta.py", line 301, in _get_build_requires
          self.run_setup()
          ~~~~~~~~~~~~~~^^
        File "/home/python/.cache/uv/builds-v0/.tmpcmYTmQ/lib/python3.13/site-packages/setuptools/build_meta.py", line 512, in run_setup
          super().run_setup(setup_script=setup_script)
          ~~~~~~~~~~~~~~~~~^^^^^^^^^^^^^^^^^^^^^^^^^^^
        File "/home/python/.cache/uv/builds-v0/.tmpcmYTmQ/lib/python3.13/site-packages/setuptools/build_meta.py", line 317, in run_setup
          exec(code, locals())
          ~~~~^^^^^^^^^^^^^^^^
        File "", line 27, in
        File "/home/python/.cache/uv/sdists-v9/pypi/mariadb/1.1.14/D386PQXS_8ffY-nlJE6dx/src/mariadb_posix.py", line 62, in get_config
          cc_version = mariadb_config(config_prg, "cc_version")
        File "/home/python/.cache/uv/sdists-v9/pypi/mariadb/1.1.14/D386PQXS_8ffY-nlJE6dx/src/mariadb_posix.py", line 28, in mariadb_config
                      raise EnvironmentError(
          ...<8 lines>...
          """)
      OSError: mariadb_config not found.

      This error typically indicates that MariaDB Connector/C, a dependency which
      must be preinstalled, is not found.
      If MariaDB Connector/C is not installed, see installation instructions
      If MariaDB Connector/C is installed, either set the environment variable
      MARIADB_CONFIG or edit the configuration file 'site.cfg' to set the
       'mariadb_config' option to the file location of the mariadb_config utility.


      hint: This usually indicates a problem with the package or the build environment.
So as suggested I have downloaded the source MariaDB C Connector, and made this mariadb_config executable available in the path:
(ai) [python@server01 ~]$ ll
total 2168
drwxr-x--- 5 python users     123 Oct 28 11:56 ai
-rw-r----- 1 python users 2218595 Oct 28 15:11 mariadb-connector-c-3.4.7-rhel8-amd64.tar.gz
(ai) [python@server01 ~]$ gtar xvf mariadb-connector-c-3.4.7-rhel8-amd64.tar.gz
(ai) [python@server01 ~]$ ll ~/mariadb-connector-c-3.4.7-rhel8-amd64/bin
total 32
-rwxr-x--- 1 python users 32200 Jul 22 23:14 mariadb_config
(ai) [python@server01 ~]$ export PATH=$PATH:~/mariadb-connector-c-3.4.7-rhel8-amd64/bin
(ai) [python@server01 ~]$ mariadb_config --cc_version
3.4.7
(ai) [python@server01 ~]$ uv pip install mariadb
Using Python 3.13.9 environment at: ai
Resolved 2 packages in 20ms
      Built mariadb==1.1.14
Prepared 1 package in 7.93s
Installed 2 packages in 18ms
 + mariadb==1.1.14
 + packaging==25.0
But I had finally add many Segmentation fault while executing my script. I discovered I had a very old MariaDB Connector C on my server which I deinstalled with:
uv pip install mariadb went well but when importing the mariadb library in Python I got this time:
>>> import mariadb
Traceback (most recent call last):
  File "", line 1, in
    import mariadb
  File "/home/python/ai/lib/python3.13/site-packages/mariadb/__init__.py", line 7, in
    from ._mariadb import (
    ...<13 lines>...
    )
ImportError: libmariadb.so.3: cannot open shared object file: No such file or directory
So at the end either you point on MariaDB Connector/C or directly in your MariaDB binary with LD_LIBRARY_PATH:
To complete preparation I also create a test database and this particular pictures table with the vector datatype, same spirit as the one I created on PostgreSQL. I also add at same time an index to speed up search query. In my PostgreSQL article I have used the cosine distance so, to be fair, I have optimized to use the same distance vector function:
MariaDB [(none)]> create database test character set utf8mb4 collate utf8mb4_general_ci comment 'My test database';
Query OK, 1 row affected (0.001 sec)

MariaDB [(none)]> use test;
Database changed

MariaDB [test]> drop table if exists pictures;
Query OK, 0 rows affected (0.006 sec)

MariaDB [test]> create table if not exists pictures(id serial primary key, name varchar(50), embedding vector(1000) not null, vector index (embedding) distance=cosine);
Query OK, 0 rows affected (0.057 sec)
The different self-supervised learning classes
Autoencoder
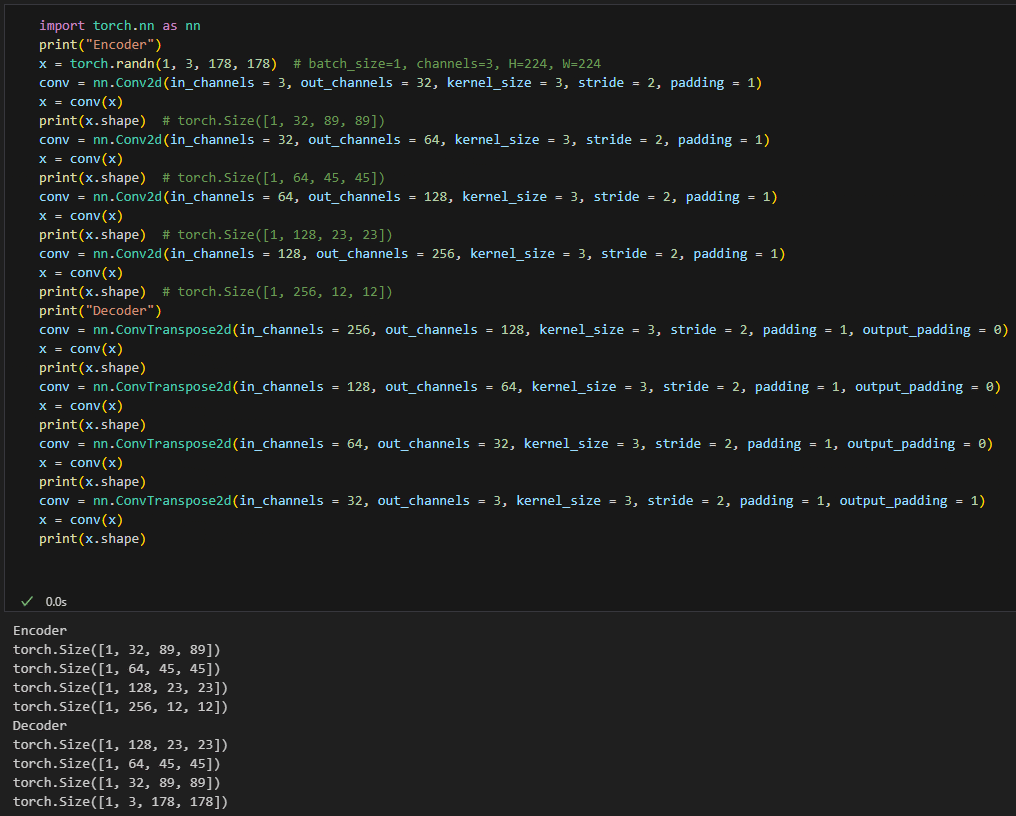
An autoencoder learns by compressing input data into a compact representation (self.encoder). This produce an embedding of the image. Then reconstructing the original image data from this representation (self.decoder). The training aim at minimizing the difference between the original image and the reconstructed image.
How did I guess the result of all this transformation to write the Autoencoder class ? Spoiler alert: I did not ! Use a simple script like below to get the result of the different transformation you apply. The target is to get an output image size from 5×5 to 16×16 if you start like me with a 178×218. If your images are smaller you can target the lower limit:
Create a file with ipynb extension and open it with Visual Studio Code. After a bunch of extensions installation to handle this new file type you will have the file opened in a Jupyter environment and be able to choose your Conda environment and execute some code like:
SimCLR learns by maximizing agreement between different augmented views of the same image and minimizing agreement with other images, using only data augmentations and a contrastive loss, no labels required. Said differently the training process aim at reducing distance between positive pairs (two transformation of the same image) and maximizing distance between negative pairs (all other images of the batch). This is why you often see this notion of positive and negative pairs of images in SimCLR articles.
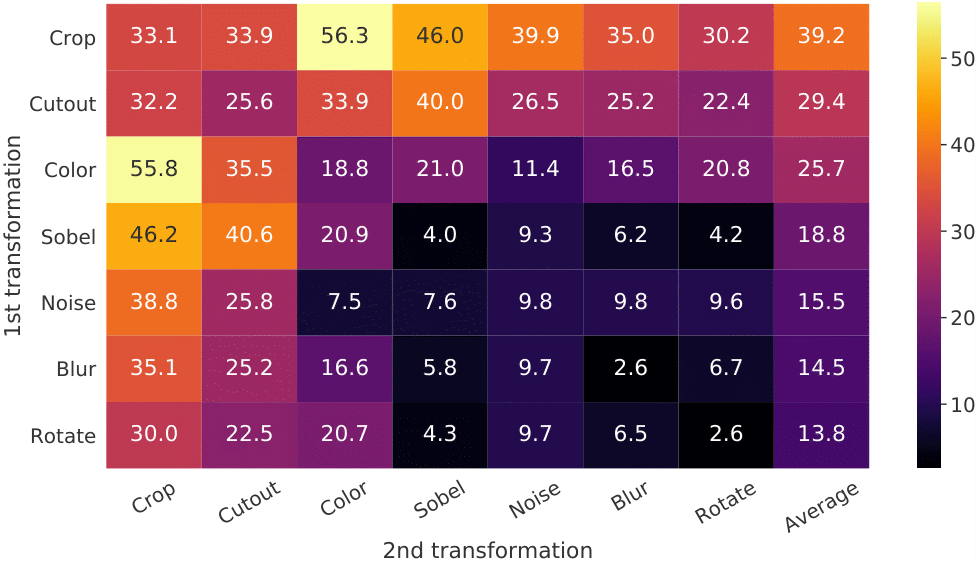
This augmented different view of the original image is done in preprocess_train function. In the SimCLR research paper there is an interesting figure on the effect of different transformation on the evaluation result:
Figure 5. Linear evaluation under individual or composition of data augmentations, applied only to one branch
I have the same preprocess as for Autoencoder to resize and color adjust. And almost exact same philosophy in encoder (SimpleCNNEncoder) function to resize my original image.
There is a small trick in the Dataset class where you have to switch versus you train or you infer. If you are in training mode the getitem function will return two transformation of the original image while in inference mode you return the resized (and color adjusted) image and the original image.
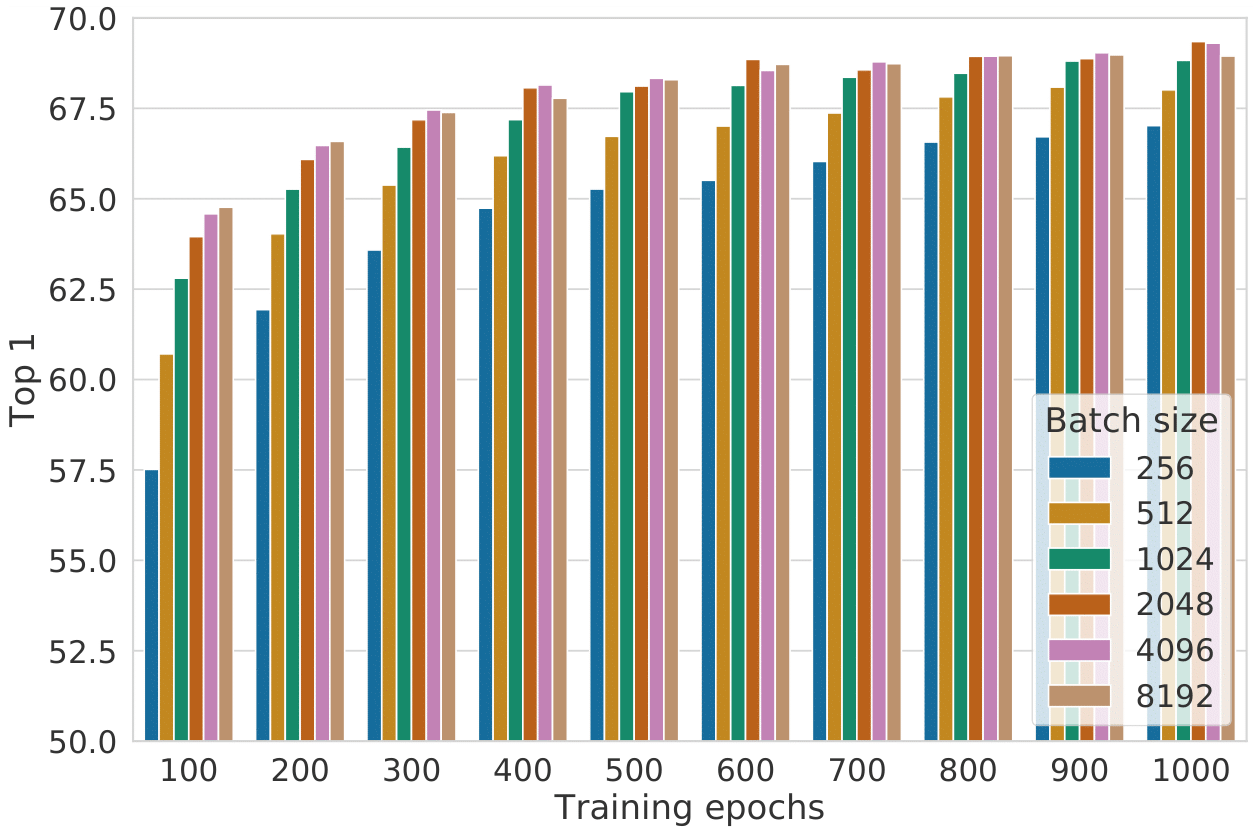
When training a SimCLR model your batch size must be substantial. See this figure from the SimCLR research paper:
Figure 9. Linear evaluation models (ResNet-50) trained with different batch size and epochs. Each bar is a single run from scratch
I have been able to train mine with batch of 2048 images but this was consuming all memory of my server (had kernel panic and reboot with bigger batches)…
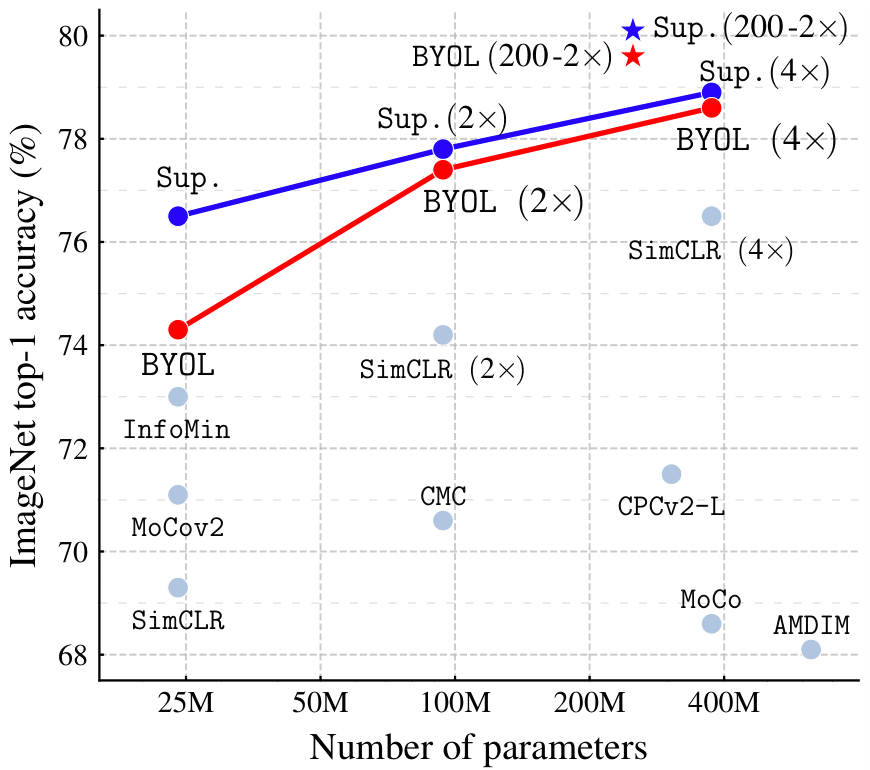
BYOL has few similarity with SimCLR and aim at correcting the drawback of its ancestor. In BYOL research paper we see that the promising is appealing:
Figure 1 Performance of BYOL on ImageNet
Unlike SimCLR, BYOL does not require negative pairs. It uses two identical networks (the online/student network and the target/teacher network) which interact and learn from each other to produce similar representations for the same augmented input image.
I’m not displaying my script to train the model but you can download it using this link. Customize few important parameters like:
DIRECTORY = '/img_align_celeba' # Where are your dataset images
BATCH_SIZE = 32 # Adjust batch size to your available memory
TRAINING_EPOCHS = 10 # Number of training epochs
EMBEDDING_DIM = 1000 # Embedding dimension
CPU_COUNT = 12 # Number of CPU cores, if you have a GPU you might tune differently
Execute it with the –mode parameter that can be autoencoder, simclr or byol:
python model_training.py --mode autoencoder
To execute it on my Linux server I have added python interpreter in first line (see comment in the script) with -u to avoid buffering in log file. And executed it with nohup:
DIRECTORY = '/img_align_celeba'
TRUNCATE_TARGET_TABLE = 'yes' # Would you like to truncate the target table?
BATCH_SIZE = 500 # Adjust batch size to your available memory, inference is consuming quite a lot... I have 32GB on my PC
EMBEDDING_DIM = 1000 # Embedding dimension
CPU_COUNT = 12 # Number of CPU cores, if you have a GPU you might tune differently
Then same as model training run it with:
python model_inference.py --mode autoencoder
To execute it on my Linux server I have added python interpreter in first line (see comment in the script) with -u to avoid buffering in log file. And executed it with nohup (or not):
Inference is much faster than training and embeddings for my 200,000 images have been computed and inserted in MariaDB in half an hour !
Flask application to display retrieved similar images
Before going to the Flask application it is always good to perform few queries to use the available function and see how MariaDB behaves:
select count(*) from test.pictures;

select id, name, vec_totext(embedding) as embedding from test.pictures limit 10;

with source as (select embedding from pictures where name ='000166.jpg')
select a.name from pictures a, source where a.name != '000166.jpg' order by vec_distance_euclidean(a.embedding, source.embedding) limit 5;
I thought that my query with the WITH was a good idea but clearly it was not. This query is performing and the response time is awful (almost 15 minutes, 10GB of InnoDB buffer pool).
It went down to 1 second after I executed:
analyze table pictures persistent for all;
In meanwhile I modified in two queries and response time is also very fast (even without statistics):
select embedding into @embedding from pictures where name ='000166.jpg';
select a.name from pictures a where a.name != '000166.jpg' order by vec_distance_euclidean(a.embedding, @embedding) limit 5;
My application is almost the same as the one for PostgreSQL, the script for MariaDB is this one, rest is identical (execute with flask –app app_mariadb.py –debug run):
from flask import Flask, render_template, request
import mariadb
from flask import jsonify

app = Flask(__name__)

@app.route("/", methods=['GET', 'POST'])
def home():
  return render_template('index.html')

@app.route("/data", methods=["POST"])
def get_data():
  data = request.get_json()
  image_name = data['image_name']
  if not image_name:
    return jsonify({"error": "No image name provided"}), 400
  connection_params= {"user" : "yjaquier", "password" : "secure_password", "host" : "server01.domain.com", "port": 3316, "database" : "test"}
  connection = mariadb.connect(**connection_params)
  cursor = connection.cursor()
  cursor.execute("select embedding into @embedding from pictures where name = %s;", (image_name, ))
  cursor.execute("SELECT a.name from pictures a WHERE a.name != %s order by VEC_DISTANCE_COSINE(a.embedding, @embedding) limit 5;", (image_name, ))
  rows = cursor.fetchall()
  cursor.close()
  connection.close()
  return jsonify(rows)

if __name__ == '__main__':
  app.run(debug = True, port = 5000)
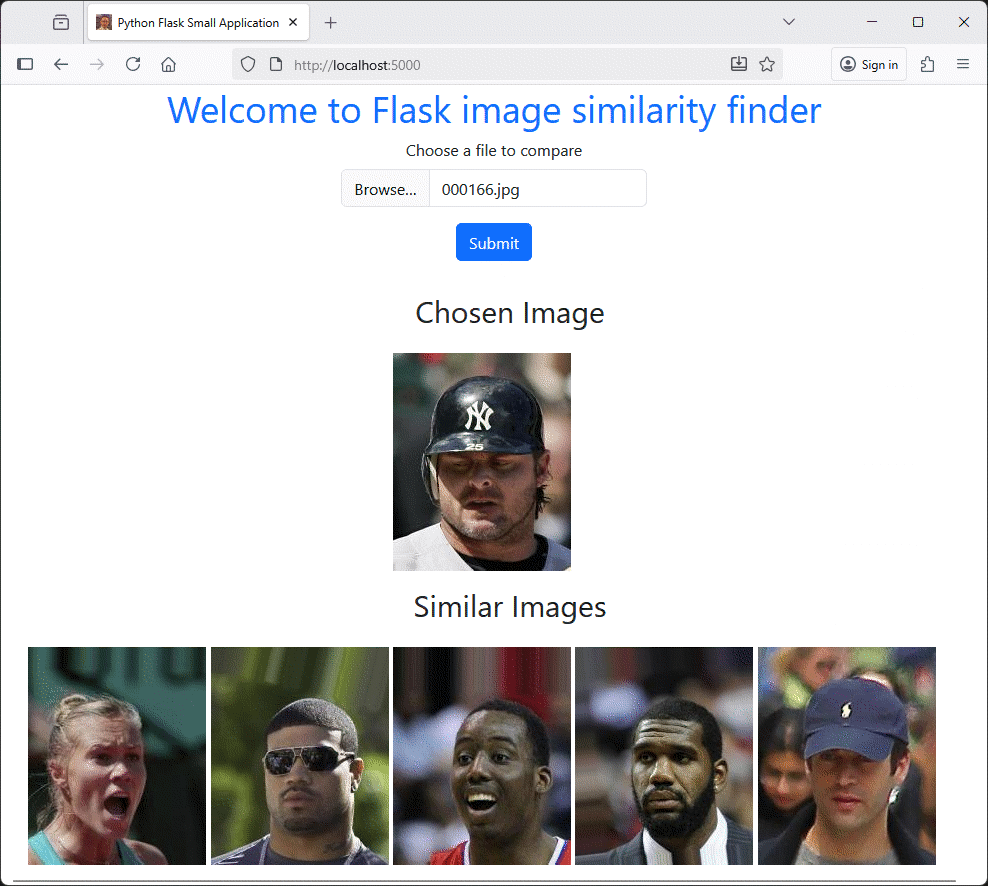
And here the results, not really impressive versus a pre-trained ResNeXt-101 64x4d model. For autoencoder:
autoencoder01
For SimCLR:
simclr01
For BYOL:
byol01
To try to push training I have done a 100 epochs traing of BYOL with image batch of 124. It has taken the ridiculous time of 9 days 36 hours and 24 minutes. For a poor result according to me:
byol02
Which clearly demonstrate (was it required to say ?) the difficulties of training your own model and the need to have strong GPU compute power available…