For some reasons I have never ever dig into SQL Server mainly because the only possible operating system was Windows. But starting with SQL Server 2017 Microsoft has started to embrace Linux and has released SQL Server on Linux with a limited set of functionalities but release after release this list is collapsing.
One cool thing that I really appreciate with SQL Server is that you get almost all cool features (compression, in-memory, security) in enterprise edition without being obliged to buy an option (like with Oracle Enterprise edition options). And for most of them they are even accessible with the standard edition like Columnstore and In-Memory Database: In-Memory OLTP.
We have even recently discovered (yes we are late) that with SQL Server Developer edition we can even have a free edition to be used in Q&A, Test and Dev only and only if you do not import into your production figures.
Microsoft is also much more flexible than Oracle on virtualization (not too hard you would say). In short you can licensed only a single virtual Machine for SQL Server or with SQL Server Enterprise edition you can license your physical host and apply for maximum virtualization (unlimited number of virtual machine running SQL Server).
According to Microsoft 30-40% of their SQL Server customers are doing Linux, most probably with the help of cloud vendors.
This first blog post is a raw installation of SQL Server 15.0.4178.1-3 on Red Hat Enterprise Linux Server release 7.9 (Maipo) but more to come…
SQL Server on Linux installation
Configure the Linux repository with:
[root@server1 ~]# cd /etc/yum.repos.d[root@server1 yum.repos.d]# wget https://packages.microsoft.com/config/rhel/7/mssql-server-2019.repo--2021-11-1011:54:38-- https://packages.microsoft.com/config/rhel/7/mssql-server-2019.repo
Resolving proxy.domain.com (proxy.domain.com)... 10.11.12.13
Connecting to proxy.domain.com (proxy.domain.com)|10.11.12.13|:8080... connected.
Proxy request sent, awaiting response... 200 OK
Length: 231[application/octet-stream]
Saving to: ‘mssql-server-2019.repo’
100%[======================================================================>]231 --.-K/s in 0s
2021-11-1011:54:39(39.3 MB/s) - ‘mssql-server-2019.repo’ saved [231/231][root@server1 yum.repos.d]# ll mssql-server-2019.repo-rw-r--r--1 root root 231 Nov 1011:26 mssql-server-2019.repo
[root@server1 yum.repos.d]# cat /etc/redhat-release
Red Hat Enterprise Linux Server release 7.9(Maipo)
[root@server1 ~]# cd /etc/yum.repos.d
[root@server1 yum.repos.d]# wget https://packages.microsoft.com/config/rhel/7/mssql-server-2019.repo
--2021-11-10 11:54:38-- https://packages.microsoft.com/config/rhel/7/mssql-server-2019.repo
Resolving proxy.domain.com (proxy.domain.com)... 10.11.12.13
Connecting to proxy.domain.com (proxy.domain.com)|10.11.12.13|:8080... connected.
Proxy request sent, awaiting response... 200 OK
Length: 231 [application/octet-stream]
Saving to: ‘mssql-server-2019.repo’100%[======================================================================>] 231 --.-K/s in 0s2021-11-10 11:54:39 (39.3 MB/s) - ‘mssql-server-2019.repo’ saved [231/231][root@server1 yum.repos.d]# ll mssql-server-2019.repo
-rw-r--r-- 1 root root 231 Nov 10 11:26 mssql-server-2019.repo
[root@server1 yum.repos.d]# cat /etc/redhat-release
Red Hat Enterprise Linux Server release 7.9 (Maipo)
Once the repository is configured the installation is as simple as:
[root@server1 ~]# dnf install -y mssql-server
[root@server1 ~]# dnf install -y mssql-server
Use the suggested command to configure SQL Server for Linux. My advice is to choose the Developer edition that has all Enterprise feature but that must not be used in production (must also not contains any production figures for testing):
[root@server1 ~]# /opt/mssql/bin/mssql-conf setup
usermod: no changes
Choose an edition of SQL Server:
1) Evaluation (free, no production use rights, 180-day limit)2) Developer (free, no production use rights)3) Express (free)4) Web (PAID)5) Standard (PAID)6) Enterprise (PAID) - CPU Core utilization restricted to 20 physical/40 hyperthreaded
7) Enterprise Core (PAID) - CPU Core utilization up to Operating System Maximum
8) I bought a license through a retail sales channel and have a product key to enter.
Details about editions can be found at
https://go.microsoft.com/fwlink/?LinkId=2109348&clcid=0x409
Use of PAID editions of this software requires separate licensing through a
Microsoft Volume Licensing program.
By choosing a PAID edition, you are verifying that you have the appropriate
number of licenses in place to install and run this software.
Enter your edition(1-8): 2
The license terms for this product can be found in/usr/share/doc/mssql-server or downloaded from:
https://go.microsoft.com/fwlink/?LinkId=2104294&clcid=0x409
The privacy statement can be viewed at:
https://go.microsoft.com/fwlink/?LinkId=853010&clcid=0x409
Do you accept the license terms? [Yes/No]:Yes
Enter the SQL Server system administrator password:
Confirm the SQL Server system administrator password:
Configuring SQL Server...
ForceFlush is enabled for this instance.
ForceFlush feature is enabled for log durability.
Created symlink from /etc/systemd/system/multi-user.target.wants/mssql-server.service to /usr/lib/systemd/system/mssql-server.service.
Setup has completed successfully. SQL Server is now starting.
[root@server1 ~]# /opt/mssql/bin/mssql-conf setup
usermod: no changes
Choose an edition of SQL Server:
1) Evaluation (free, no production use rights, 180-day limit)
2) Developer (free, no production use rights)
3) Express (free)
4) Web (PAID)
5) Standard (PAID)
6) Enterprise (PAID) - CPU Core utilization restricted to 20 physical/40 hyperthreaded
7) Enterprise Core (PAID) - CPU Core utilization up to Operating System Maximum
8) I bought a license through a retail sales channel and have a product key to enter.Details about editions can be found at
https://go.microsoft.com/fwlink/?LinkId=2109348&clcid=0x409Use of PAID editions of this software requires separate licensing through a
Microsoft Volume Licensing program.
By choosing a PAID edition, you are verifying that you have the appropriate
number of licenses in place to install and run this software.Enter your edition(1-8): 2
The license terms for this product can be found in
/usr/share/doc/mssql-server or downloaded from:
https://go.microsoft.com/fwlink/?LinkId=2104294&clcid=0x409The privacy statement can be viewed at:
https://go.microsoft.com/fwlink/?LinkId=853010&clcid=0x409Do you accept the license terms? [Yes/No]:YesEnter the SQL Server system administrator password:
Confirm the SQL Server system administrator password:
Configuring SQL Server...ForceFlush is enabled for this instance.
ForceFlush feature is enabled for log durability.
Created symlink from /etc/systemd/system/multi-user.target.wants/mssql-server.service to /usr/lib/systemd/system/mssql-server.service.
Setup has completed successfully. SQL Server is now starting.
I have decided to create a dedicated Veritas FileSystem to store all my database file (much better than using the system disks):
[root@server1 ~]# vxassist -g vgperp maxsize
Maximum volume size: 136239104(66523Mb)[root@server1 ~]# vxassist -g vgperp make lvol4 1g[root@server1 ~]# vxassist -g vgperp maxsize
Maximum volume size: 134141952(65499Mb)[root@server1 ~]# mkfs -t vxfs -o bsize=8192,largefiles /dev/vx/rdsk/vgperp/lvol4
version 15 layout
2097152 sectors, 131072 blocks of size8192, log size2048 blocks
rcq size128 blocks
largefiles supported
maxlink supported
WORM not supported
[root@server1 ~]# grep mssql /etc/fstab/dev/vx/dsk/vgperp/lvol4 /mssql vxfs defaults,_netdev 12[root@server1 ~]# mount -a[root@server1 ~]# df -h /mssql
Filesystem Size Used Avail Use% Mounted on
/dev/vx/dsk/vgperp/lvol4 1.0G 19M 998M 2%/mssql
[root@server1 ~]# chown mssql:mssql /mssql
If you do not want to have SQL Server database files spread everywhere like in my first trail you have to configure few environment variables:
[root@server1 mssql]# ll ~mssql
total 12
drwxr-xr-x 2 mssql mssql 4096 Nov 1012:10 data
drwxr-xr-x 2 mssql mssql 4096 Nov 1012:20 log
-rw-r--r--1 mssql mssql 51 Nov 1012:09 mssql.conf
drwxr-xr-x 2 mssql mssql 25 Nov 1012:10 secrets
[root@server1 mssql]# ll ~mssql
total 12
drwxr-xr-x 2 mssql mssql 4096 Nov 10 12:10 data
drwxr-xr-x 2 mssql mssql 4096 Nov 10 12:20 log
-rw-r--r-- 1 mssql mssql   51 Nov 10 12:09 mssql.conf
drwxr-xr-x 2 mssql mssql   25 Nov 10 12:10 secrets
I have decided to change few parameters (listening port) and change first the location of the master database:
[root@server1 ~]# /opt/mssql/bin/mssql-conf set network.tcpport 1443
SQL Server needs to be restarted in order to apply this setting. Please run
'systemctl restart mssql-server.service'.
[root@server1 ~]# /opt/mssql/bin/mssql-conf set filelocation.defaultdatadir /mssql/data
SQL Server needs to be restarted in order to apply this setting. Please run
'systemctl restart mssql-server.service'.
[root@server1 ~]# /opt/mssql/bin/mssql-conf set filelocation.defaultlogdir /mssql/log
SQL Server needs to be restarted in order to apply this setting. Please run
'systemctl restart mssql-server.service'.
[root@server1 ~]# /opt/mssql/bin/mssql-conf set filelocation.defaultdumpdir /mssql/dump[root@server1 ~]# /opt/mssql/bin/mssql-conf set filelocation.defaultbackupdir /mssql/backup/
SQL Server needs to be restarted in order to apply this setting. Please run
'systemctl restart mssql-server.service'.
[root@server1 ~]# /opt/mssql/bin/mssql-conf set filelocation.masterdatafile /mssql/masterdatabasedir/master.mdf
SQL Server needs to be restarted in order to apply this setting. Please run
'systemctl restart mssql-server.service'.
[root@server1 ~]# /opt/mssql/bin/mssql-conf set filelocation.masterlogfile /mssql/masterdatabasedir/mastlog.ldf
SQL Server needs to be restarted in order to apply this setting. Please run
'systemctl restart mssql-server.service'.
[root@server1 ~]# /opt/mssql/bin/mssql-conf set memory.memorylimitmb 1024
SQL Server needs to be restarted in order to apply this setting. Please run
'systemctl restart mssql-server.service'.
[root@server1 ~]# cat ~mssql/mssql.conf[sqlagent]
enabled = false[EULA]
accepteula = Y
[network]
tcpport = 1443[filelocation]
defaultdatadir = /mssql/data
defaultlogdir = /mssql/log
defaultdumpdir = /mssql/dump
defaultbackupdir = /mssql/backup/
masterdatafile = /mssql/masterdatabasedir/master.mdf
masterlogfile = /mssql/masterdatabasedir/mastlog.ldf
[memory]
memorylimitmb = 1024
[root@server1 ~]# /opt/mssql/bin/mssql-conf set network.tcpport 1443
SQL Server needs to be restarted in order to apply this setting. Please run
'systemctl restart mssql-server.service'.
[root@server1 ~]# /opt/mssql/bin/mssql-conf set filelocation.defaultdatadir /mssql/data
SQL Server needs to be restarted in order to apply this setting. Please run
'systemctl restart mssql-server.service'.
[root@server1 ~]# /opt/mssql/bin/mssql-conf set filelocation.defaultlogdir /mssql/log
SQL Server needs to be restarted in order to apply this setting. Please run
'systemctl restart mssql-server.service'.
[root@server1 ~]# /opt/mssql/bin/mssql-conf set filelocation.defaultdumpdir /mssql/dump
[root@server1 ~]# /opt/mssql/bin/mssql-conf set filelocation.defaultbackupdir /mssql/backup/
SQL Server needs to be restarted in order to apply this setting. Please run
'systemctl restart mssql-server.service'.
[root@server1 ~]# /opt/mssql/bin/mssql-conf set filelocation.masterdatafile /mssql/masterdatabasedir/master.mdf
SQL Server needs to be restarted in order to apply this setting. Please run
'systemctl restart mssql-server.service'.
[root@server1 ~]# /opt/mssql/bin/mssql-conf set filelocation.masterlogfile /mssql/masterdatabasedir/mastlog.ldf
SQL Server needs to be restarted in order to apply this setting. Please run
'systemctl restart mssql-server.service'.
[root@server1 ~]# /opt/mssql/bin/mssql-conf set memory.memorylimitmb 1024
SQL Server needs to be restarted in order to apply this setting. Please run
'systemctl restart mssql-server.service'.
[root@server1 ~]# cat ~mssql/mssql.conf
[sqlagent]
enabled = false[EULA]
accepteula = Y[network]
tcpport = 1443[filelocation]
defaultdatadir = /mssql/data
defaultlogdir = /mssql/log
defaultdumpdir = /mssql/dump
defaultbackupdir = /mssql/backup/
masterdatafile = /mssql/masterdatabasedir/master.mdf
masterlogfile = /mssql/masterdatabasedir/mastlog.ldf[memory]
memorylimitmb = 1024
To validate the master database file directory change you need to stop the service, move the files from OS standpoint and finally restart the service:
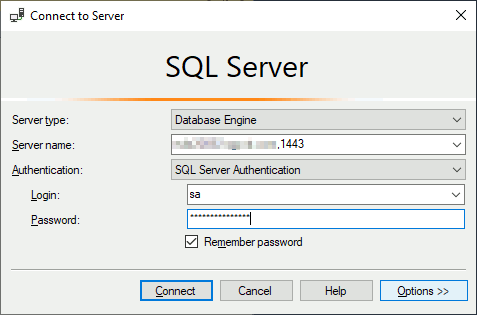
You can connect to your local instance with command line (add /opt/mssql-tools/bin directory in your path):
[mssql@server1 ~]$ sqlcmd -S localhost,1443-U SA
Password:
1>2> CREATE DATABASE testdb
3> go
1> SELECT Name from sys.Databases
2> go
Name
--------------------------------------------------------------------------------------------------------------------------------
master
tempdb
model
msdb
testdb
(5 rows affected)1>
[mssql@server1 ~]$ sqlcmd -S localhost,1443 -U SA
Password:
1>
2> CREATE DATABASE testdb
3> go
1> SELECT Name from sys.Databases
2> go
Name
--------------------------------------------------------------------------------------------------------------------------------
master
tempdb
model
msdb
testdb(5 rows affected)
1>
Final cleaning to have all database files in good directories
For msdb and model files you can use the below four simple command (you can create a SQL file and use -i option of sqlcmd to execute the file):
--MSDB database file and log filealterdatabase msdb modifyfile(Name = mSDBData, FILENAME ='/mssql/systemdatabasedir/MSDBData.mdf')
go
alterdatabase msdb modifyfile(name = msdblog, filename ='/mssql/systemdatabasedir/MSDBLog.ldf');
go
--MODEL database file and log filealterdatabase model modifyfile(name = modeldev, filename ='/mssql/systemdatabasedir/Model.mdf')
go
alterdatabase model modifyfile(name = modellog, filename ='/mssql/systemdatabasedir/Modellog.ldf');
go
--MSDB database file and log file
alter database msdb modify file (Name = mSDBData, FILENAME = '/mssql/systemdatabasedir/MSDBData.mdf')
go
alter database msdb modify file (name = msdblog, filename = '/mssql/systemdatabasedir/MSDBLog.ldf');
go
--MODEL database file and log file
alter database model modify file (name = modeldev, filename = '/mssql/systemdatabasedir/Model.mdf')
go
alter database model modify file (name = modellog, filename = '/mssql/systemdatabasedir/Modellog.ldf');
go
For tempdb you can auto-generate the modification script with:
1> SELECT concat('alter database tempdb modify file(name=',name,',filename=''', physical_name, ''')') AS command FROM sys.master_files WHERE database_id = DB_ID('TempDB');
2> go
command
--------------------------------------------------------------------------------------------------------------------------------------------------------
alter database tempdb modify file(name=tempdev,filename='/var/opt/mssql/data/tempdb.mdf')
alter database tempdb modify file(name=templog,filename='/var/opt/mssql/data/templog.ldf')
alter database tempdb modify file(name=tempdev2,filename='/var/opt/mssql/data/tempdb2.ndf')
alter database tempdb modify file(name=tempdev3,filename='/var/opt/mssql/data/tempdb3.ndf')
alter database tempdb modify file(name=tempdev4,filename='/var/opt/mssql/data/tempdb4.ndf')
alter database tempdb modify file(name=tempdev5,filename='/var/opt/mssql/data/tempdb5.ndf')
alter database tempdb modify file(name=tempdev6,filename='/var/opt/mssql/data/tempdb6.ndf')
alter database tempdb modify file(name=tempdev7,filename='/var/opt/mssql/data/tempdb7.ndf')
alter database tempdb modify file(name=tempdev8,filename='/var/opt/mssql/data/tempdb8.ndf')(9 rows affected)
Then push the result in a SQL file modify the path to match you desired target directory (/mssql/systemdatabasedir/ for me) and execute the script. A final stop of the instance, a move of files at OS level and an instance start will finalize the modification…
[mssql@server1 ~]$ cd /msql/backup
[mssql@server1 backup]$ wget https://github.com/Microsoft/sql-server-samples/releases/download/adventureworks/AdventureWorks2019.bak
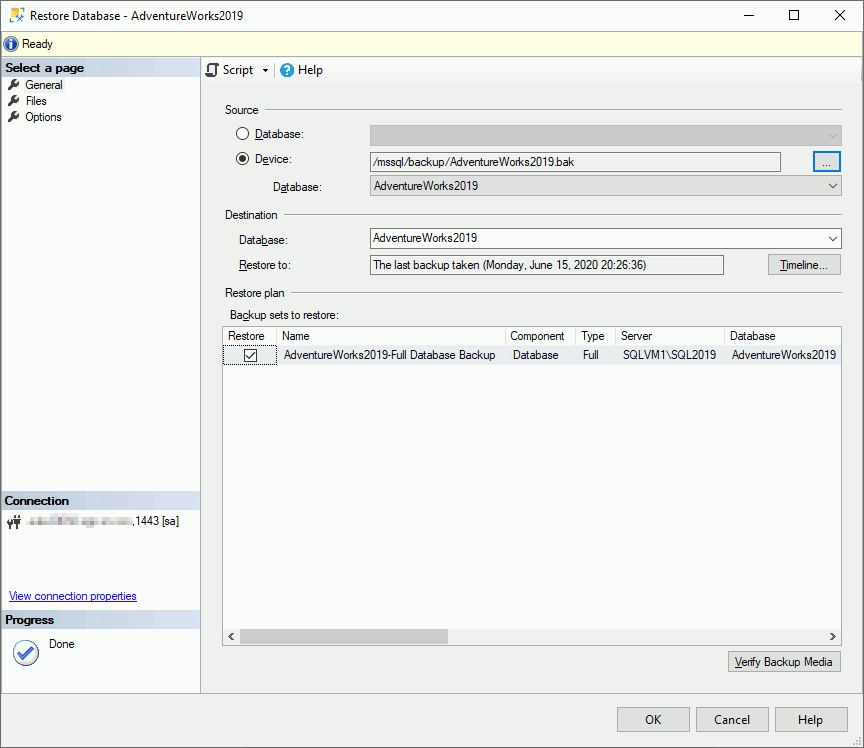
Even if I love command line I have to admit that SSMS is a great piece of software and you can restore the backup file in really few mouse click. Choose the backup file:
sql_server_linux_installation03
File mapping is done automatically with value of defaultdatadir and defaultlogdir:
sql_server_linux_installation04
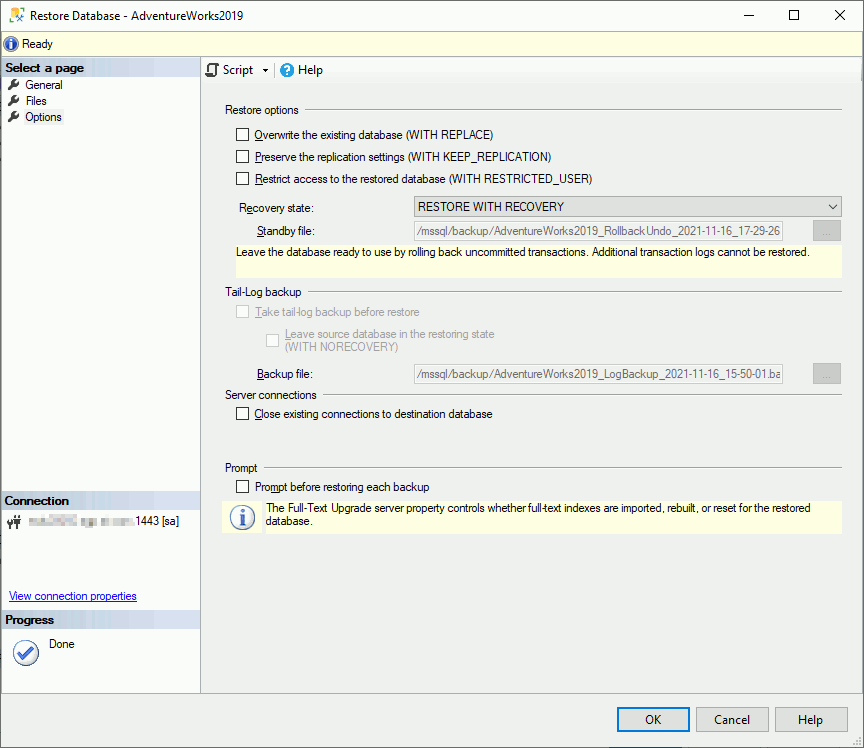
Not much to choose here, but useful for other personnal backups:
sql_server_linux_installation05
You can also generate a script that could be helpfull if you want to script or if, like me, trying to go further in your SQL Server understanding. Those below command could help you to generatete the right TSQL restore command:
1>selecttop(10) firstname, lastname from adventureworks2019.person.person2> go
firstname lastname
-------------------------------------------------- --------------------------------------------------
Syed Abbas
Catherine Abel
Kim Abercrombie
Kim Abercrombie
Kim Abercrombie
Hazem Abolrous
Sam Abolrous
Humberto Acevedo
Gustavo Achong
Pilar Ackerman
(10rows affected)
1> select top(10) firstname, lastname from adventureworks2019.person.person
2> go
firstname lastname
-------------------------------------------------- --------------------------------------------------
Syed Abbas
Catherine Abel
Kim Abercrombie
Kim Abercrombie
Kim Abercrombie
Hazem Abolrous
Sam Abolrous
Humberto Acevedo
Gustavo Achong
Pilar Ackerman(10 rows affected)
Conclusion and next steps
Frankly this testing has really been seamless and all has really worked perfectly. Kudos to Microsoft. It worked so well that I clearly plan to test soon advanced features like: