Table of contents
Preamble
Before describing Kubernetes (K8s for short) let’s briefly see what is container technology. Container is similar to virtualization technology, such a VMWare, but they are lightweight as the underlining operating system is shared amongst containers. Same as VM resource allocation (filesystem, CPU, memory, ..) is controlled to avoid having one container eating all resources and impacting the others. Containers are also portable across OS and different Cloud providers.
Container technology is not something new and I have personally started to hear a lot about container with the rise of Docker. Even if nowadays you have plenty of products that compete with Docker: Podman, containerd and CRI-O to name a few. Even if you have not created containers on your own you might have tested an application that was containerized and if you had the underlining infrastructure you have experienced how easy it is to deploy a container and to use the application almost immediately without the burden of configuration or so.
Once you have all those applicative containers running how do you manage them ? Kubernetes of course ! Kubernetes is a open source platform to manage containerized workloads and services. Example of tasks handle by Kubernetes are scaling, managing downtime and much more…
My ultimate goal, as you might guess, is to create container running a database (I have already tested SQL Server in container) and to create what we call stateful container. It means that the container has persistent storage, yes of course you do not want to lose the content of your database in case of a container crash. This fist article will focus only on stateless container that is typically a web server where you do not mind of loosing the content…
For my testing I have used two virtual machines (with VirtualBox) running Oracle Linux Server release 8.4. Kubernetes version is 1.22.2 and Docker is 20.10.9.
This first part will be “just” about creating the cluster with the main first master node as well as adding a second worker node to handle workload…
Kubernetes installation
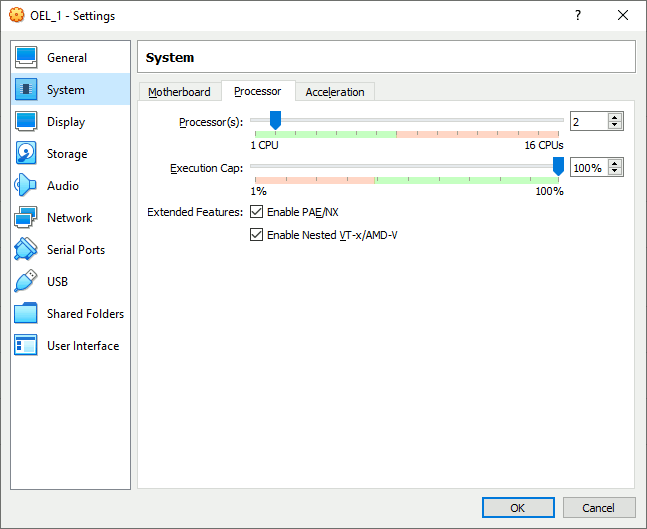
I have used a virtual machine under VirtualBox running Oracle Linux 8.4. One important configuration is to activate virtualization feature and nested virtualization feature (not available since long on VirtualBox) with:
You can confirm nested virtualization feature is active with:
[root@server1 ~]# grep -E --color 'vmx|svm' /proc/cpuinfo flags : fpu vme de pse tsc msr pae mce cx8 apic sep mtrr pge mca cmov pat pse36 clflush mmx fxsr sse sse2 ht syscall nx rdtscp lm constant_tsc rep_good nopl xtopology nonstop_tsc cpuid tsc_known_freq pni pclmulqdq vmx ssse3 cx16 pcid sse4_1 sse4_2 x2apic movbe popcnt aes xsave avx rdrand hypervisor lahf_lm abm invpcid_single pti tpr_shadow vnmi flexpriority vpid fsgsbase avx2 invpcid md_clear flush_l1d flags : fpu vme de pse tsc msr pae mce cx8 apic sep mtrr pge mca cmov pat pse36 clflush mmx fxsr sse sse2 ht syscall nx rdtscp lm constant_tsc rep_good nopl xtopology nonstop_tsc cpuid tsc_known_freq pni pclmulqdq vmx ssse3 cx16 pcid sse4_1 sse4_2 x2apic movbe popcnt aes xsave avx rdrand hypervisor lahf_lm abm invpcid_single pti tpr_shadow vnmi flexpriority vpid fsgsbase avx2 invpcid md_clear flush_l1d |
Add the Kubernetes repository with:
[root@server1 ~]# cat << EOF > /etc/yum.repos.d/kubernetes.repo > [kubernetes] > name=Kubernetes > baseurl=https://packages.cloud.google.com/yum/repos/kubernetes-el7-x86_64 > enabled=1 > gpgcheck=1 > repo_gpgcheck=1 > gpgkey=https://packages.cloud.google.com/yum/doc/yum-key.gpg https://packages.cloud.google.com/yum/doc/rpm-package-key.gpg > EOF |
To download packages and if, like me, you are behind a corporate proxy configura it with a .wgetrc file in the home folder of your account (root in my case). I have also added check_certificate=off to free me from certificate that are not verified by my proxy server (the literature is either mentioning check-certificate or check_certificate so I guess both are working):
[root@server1 ~]# cat .wgetrc use_proxy=on https_proxy=http://proxy_server:proxy_port/ http_proxy=http://proxy_server:proxy_por/ proxy_user=proxy_account proxy_password=proxy_password check_certificate=off no_proxy=192.168.0.0/16,10.0.0.0/8 |
You also need to configure dnf package manager to go though your proxy by adding in /etc/dnf/dnf.conf file:
# The proxy server - proxy server:port number proxy=http://proxy_server:proxy_port # The account details for yum connections proxy_username=proxy_account proxy_password=proxy_password sslverify=False |
Starting from the Kubernetes getting started web page I have asked myself where to start. I have initially tried with minikube but if like me you really start with your own virtual machine and plan to add one or more worker to your Kubernetes instance then it’s a cluster managed by yourself and you should use kubeadm ! Install kubctl, kubeadm and kubelet with:
[root@server1 ~]# dnf install -y kubelet kubeadm kubectl --disableexcludes=kubernetes |
Enable kubelet service with:
[root@server1 ~]# systemctl enable kubelet.service Created symlink /etc/systemd/system/multi-user.target.wants/kubelet.service → /usr/lib/systemd/system/kubelet.service. |
Deactivate swap as requested:
[root@server1 ~]# cat /etc/fstab | grep swap #/dev/mapper/vg00-swap swap swap defaults 0 0 [root@server1 ~]# swapoff -a [root@server1 ~]# free -h total used free shared buff/cache available Mem: 7.6Gi 311Mi 5.8Gi 8.0Mi 1.5Gi 7.0Gi Swap: 0B 0B 0B |
Network prerequisites for container runtime:
[root@server1 ~]# cat /etc/sysctl.d/k8s.conf net.bridge.bridge-nf-call-ip6tables = 1 net.bridge.bridge-nf-call-iptables = 1 net.ipv4.ip_forward = 1 [root@server1 ~]# sysctl --system [root@server1 ~]# cat /etc/modules-load.d/k8s.conf overlay br_netfilter [root@server1 ~]# modprobe overlay [root@server1 ~]# modprobe br_netfilter |
SELinux already deactivated on all my nodes…
I have also tried to choose a different container runtime than Docker. I have tried using Podamn (that I already widely use) and its podam-docker package to have Docker-like commands. Never been able to configure my Kubernetes cluster. I have also trie only with containerd, same story all trials went wrong.
Few errors encountered and their solution:
- Podman even with Docker compatible package is not really compatible with Kubernetes, particularly for the service that is not there. So use command line option to pass false errors: –ignore-preflight-errors=all or to fine tune –ignore-preflight-errors IsDockerSystemdCheck,SystemVerification,Service-Docker
-
[server.go:629] “Failed to get the kubelet’s cgroup. Kubelet system container metrics may be missing.” err=”cpu and memory cgroup hierarchy not unified.
I solved this one by installing libcgroup with dnf install libcgroup -
[WARNING HTTPProxy]: Connection to “https://192.168.56.101” uses proxy “http://proxy_user:proxy_password@proxy_server:proxy_port”. If that is not intended, adjust your proxy settings
I solved it by exporting this variable with export NO_PROXY=192.168.0.0/16,10.0.0.0/8 -
[WARNING FileExisting-tc]: tc not found in system path
Solved this one by installation iproute-tc with dnf install iproute-tc
At each run to purge previous configuration file use:
[root@server1 ~]# kubeadm reset |
Sometime it worked but when looking in log files I had many error, particularly with kubelet service (if you have not yet played with kubeadm command the kubelet service is simply in activating (auto-restart)):
[root@server1 ~]# vi /var/log/messages [root@server1 ~]# systemctl status kubelet [root@server1 ~]# journalctl -xeu kubelet |
Finally installed docker-ce, to be honest all had work like a charm at this point:
[root@server1 ~]# dnf config-manager --add-repo=https://download.docker.com/linux/centos/docker-ce.repo Adding repo from: https://download.docker.com/linux/centos/docker-ce.repo [root@server1 ~]# dnf remove -y buildah runc [root@server1 ~]# dnf install -y containerd.io docker-ce [root@server1 ~]# systemctl enable docker [root@server1 ~]# systemctl daemon-reload [root@server1 ~]# systemctl restart docker |
And configured docker for proxy access and to use systemd for the management of the container’s cgroups:
[root@server1 ~]# cat << EOF > /etc/systemd/system/docker.service.d/https-proxy.conf > [Service] > Environment="HTTPS_PROXY=http://proxy_account:proxy_password@proxy_server:proxy_port" EOF [root@server1 ~]# mkdir /etc/docker [root@server1 ~]# cat << EOF > /etc/docker/daemon.json > { > "exec-opts": ["native.cgroupdriver=systemd"], > "log-driver": "json-file", > "log-opts": { > "max-size": "100m" > }, > "storage-driver": "overlay2" > } EOF [root@server1 ~]# systemctl daemon-reload [root@server1 ~]# systemctl restart docker |
I have anyway benefited from my previous trials and end-up with this kubeadm init command (I have decided to use a different subnet for the pod network 192.168.55.0/24):
[root@server1 ~]# export HTTPS_PROXY='http://proxy_account:proxy_password@proxy_server:proxy_port' [root@server1 ~]# export NO_PROXY=192.168.0.0/16,10.0.0.0/8 [root@server1 ~]# kubeadm init --apiserver-advertise-address 192.168.56.101 --pod-network-cidr 192.168.55.0/24 [init] Using Kubernetes version: v1.22.2 [preflight] Running pre-flight checks [preflight] Pulling images required for setting up a Kubernetes cluster [preflight] This might take a minute or two, depending on the speed of your internet connection [preflight] You can also perform this action in beforehand using 'kubeadm config images pull' [certs] Using certificateDir folder "/etc/kubernetes/pki" [certs] Generating "ca" certificate and key [certs] Generating "apiserver" certificate and key [certs] apiserver serving cert is signed for DNS names [kubernetes kubernetes.default kubernetes.default.svc kubernetes.default.svc.cluster.local server1.domain.com] and IPs [10.96.0.1 192.168.56.101] [certs] Generating "apiserver-kubelet-client" certificate and key [certs] Generating "front-proxy-ca" certificate and key [certs] Generating "front-proxy-client" certificate and key [certs] Generating "etcd/ca" certificate and key [certs] Generating "etcd/server" certificate and key [certs] etcd/server serving cert is signed for DNS names [localhost server1.domain.com] and IPs [192.168.56.101 127.0.0.1 ::1] [certs] Generating "etcd/peer" certificate and key [certs] etcd/peer serving cert is signed for DNS names [localhost server1.domain.com] and IPs [192.168.56.101 127.0.0.1 ::1] [certs] Generating "etcd/healthcheck-client" certificate and key [certs] Generating "apiserver-etcd-client" certificate and key [certs] Generating "sa" key and public key [kubeconfig] Using kubeconfig folder "/etc/kubernetes" [kubeconfig] Writing "admin.conf" kubeconfig file [kubeconfig] Writing "kubelet.conf" kubeconfig file [kubeconfig] Writing "controller-manager.conf" kubeconfig file [kubeconfig] Writing "scheduler.conf" kubeconfig file [kubelet-start] Writing kubelet environment file with flags to file "/var/lib/kubelet/kubeadm-flags.env" [kubelet-start] Writing kubelet configuration to file "/var/lib/kubelet/config.yaml" [kubelet-start] Starting the kubelet [control-plane] Using manifest folder "/etc/kubernetes/manifests" [control-plane] Creating static Pod manifest for "kube-apiserver" [control-plane] Creating static Pod manifest for "kube-controller-manager" [control-plane] Creating static Pod manifest for "kube-scheduler" [etcd] Creating static Pod manifest for local etcd in "/etc/kubernetes/manifests" [wait-control-plane] Waiting for the kubelet to boot up the control plane as static Pods from directory "/etc/kubernetes/manifests". This can take up to 4m0s [apiclient] All control plane components are healthy after 24.005381 seconds [upload-config] Storing the configuration used in ConfigMap "kubeadm-config" in the "kube-system" Namespace [kubelet] Creating a ConfigMap "kubelet-config-1.22" in namespace kube-system with the configuration for the kubelets in the cluster [upload-certs] Skipping phase. Please see --upload-certs [mark-control-plane] Marking the node server1.domain.com as control-plane by adding the labels: [node-role.kubernetes.io/master(deprecated) node-role.kubernetes.io/control-plane node.kubernetes.io/exclude-from-external-load-balancers] [mark-control-plane] Marking the node server1.domain.com as control-plane by adding the taints [node-role.kubernetes.io/master:NoSchedule] [bootstrap-token] Using token: wa7cwx.pml1pqv2i9tnhqkf [bootstrap-token] Configuring bootstrap tokens, cluster-info ConfigMap, RBAC Roles [bootstrap-token] configured RBAC rules to allow Node Bootstrap tokens to get nodes [bootstrap-token] configured RBAC rules to allow Node Bootstrap tokens to post CSRs in order for nodes to get long term certificate credentials [bootstrap-token] configured RBAC rules to allow the csrapprover controller automatically approve CSRs from a Node Bootstrap Token [bootstrap-token] configured RBAC rules to allow certificate rotation for all node client certificates in the cluster [bootstrap-token] Creating the "cluster-info" ConfigMap in the "kube-public" namespace [kubelet-finalize] Updating "/etc/kubernetes/kubelet.conf" to point to a rotatable kubelet client certificate and key [addons] Applied essential addon: CoreDNS [addons] Applied essential addon: kube-proxy Your Kubernetes control-plane has initialized successfully! To start using your cluster, you need to run the following as a regular user: mkdir -p $HOME/.kube sudo cp -i /etc/kubernetes/admin.conf $HOME/.kube/config sudo chown $(id -u):$(id -g) $HOME/.kube/config Alternatively, if you are the root user, you can run: export KUBECONFIG=/etc/kubernetes/admin.conf You should now deploy a pod network to the cluster. Run "kubectl apply -f [podnetwork].yaml" with one of the options listed at: https://kubernetes.io/docs/concepts/cluster-administration/addons/ Then you can join any number of worker nodes by running the following on each as root: kubeadm join 192.168.56.101:6443 --token wa7cwx.pml1pqv2i9tnhqkf \ --discovery-token-ca-cert-hash sha256:83352a4e1e18e59b4e5a453c1d8573b1fcd718982e0e398741d9182a966472fa |
Remark:
If you have lost the join command you can regenerate it with:
[root@server1 ~]# kubeadm token create --print-join-command --v=5 |
When required to install a Pod network addon I have chosen Flannel. To be able to download from Internet you might be needed to export your proxy configuration if like me you have a corporate proxy (KUBECONFIG cat be put directly in the profile of your root account):
[root@server1 ~]# export KUBECONFIG=/etc/kubernetes/admin.conf [root@server1 ~]# export HTTPS_PROXY='http://proxy_account:proxy_password@proxy_server:proxy_port' [root@server1 ~]# export NO_PROXY=192.168.0.0/16,10.0.0.0/8 [root@server1 ~]# kubectl apply -f https://raw.githubusercontent.com/coreos/flannel/master/Documentation/kube-flannel.yml Warning: policy/v1beta1 PodSecurityPolicy is deprecated in v1.21+, unavailable in v1.25+ podsecuritypolicy.policy/psp.flannel.unprivileged created clusterrole.rbac.authorization.k8s.io/flannel created clusterrolebinding.rbac.authorization.k8s.io/flannel created serviceaccount/flannel created configmap/kube-flannel-cfg created daemonset.apps/kube-flannel-ds created |
[root@server1 ~]# kubectl cluster-info Kubernetes control plane is running at https://192.168.56.101:6443 CoreDNS is running at https://192.168.56.101:6443/api/v1/namespaces/kube-system/services/kube-dns:dns/proxy To further debug and diagnose cluster problems, use 'kubectl cluster-info dump'. [root@server1 ~]# kubectl get nodes NAME STATUS ROLES AGE VERSION server1.domain.com Ready control-plane,master 82m v1.21.3 [root@server1 ~]# kubectl get pods --all-namespaces NAMESPACE NAME READY STATUS RESTARTS AGE kube-system coredns-78fcd69978-8mtv9 1/1 Running 0 87s kube-system coredns-78fcd69978-d5vpz 1/1 Running 0 87s kube-system etcd-server1.domain.com 1/1 Running 2 98s kube-system kube-apiserver-server1.domain.com 1/1 Running 0 103s kube-system kube-controller-manager-server1.domain.com 1/1 Running 0 98s kube-system kube-flannel-ds-4lpk4 1/1 Running 0 33s kube-system kube-proxy-9c2pr 1/1 Running 0 87s kube-system kube-scheduler-server1.domain.com 1/1 Running 0 98s |
Kubernetes Web UI dashboard
For the Kubernetes list of addons I have chosen to install the web UI dashboard as it always help to have a graphical interface to manage things even if at the end of day you mainly work command line:
[root@server1 ~]# kubectl apply -f https://raw.githubusercontent.com/kubernetes/dashboard/v2.3.1/aio/deploy/recommended.yaml namespace/kubernetes-dashboard created serviceaccount/kubernetes-dashboard created service/kubernetes-dashboard created secret/kubernetes-dashboard-certs created secret/kubernetes-dashboard-csrf created secret/kubernetes-dashboard-key-holder created configmap/kubernetes-dashboard-settings created role.rbac.authorization.k8s.io/kubernetes-dashboard created clusterrole.rbac.authorization.k8s.io/kubernetes-dashboard created rolebinding.rbac.authorization.k8s.io/kubernetes-dashboard created clusterrolebinding.rbac.authorization.k8s.io/kubernetes-dashboard created deployment.apps/kubernetes-dashboard created service/dashboard-metrics-scraper created Warning: spec.template.metadata.annotations[seccomp.security.alpha.kubernetes.io/pod]: deprecated since v1.19; use the "seccompProfile" field instead deployment.apps/dashboard-metrics-scraper created |
I had an issue and the pods did not come up, so investigated with:
[root@server1 ~]# kubectl describe pods --namespace=kubernetes-dashboard Name: dashboard-metrics-scraper-856586f554-lj429 Namespace: kubernetes-dashboard Priority: 0 Node: server1.domain.com/192.168.56.101 Start Time: Mon, 26 Jul 2021 15:53:35 +0200 Labels: k8s-app=dashboard-metrics-scraper pod-template-hash=856586f554 . . . Events: Type Reason Age From Message ---- ------ ---- ---- ------- Warning Failed 10m (x19 over 104m) kubelet Failed to pull image "kubernetesui/dashboard:v2.3.1": rpc error: code = Unknown desc = context canceled Normal Pulling 5m19s (x20 over 105m) kubelet Pulling image "kubernetesui/dashboard:v2.3.1" Normal BackOff 26s (x355 over 104m) kubelet Back-off pulling image "kubernetesui/dashboard:v2.3.1" |
And pulled the Docker image manually with:
[root@server1 ~]# docker pull kubernetesui/dashboard:v2.3.1 v2.3.1: Pulling from kubernetesui/dashboard b82bd84ec244: Pull complete 21c9e94e8195: Pull complete Digest: sha256:ec27f462cf1946220f5a9ace416a84a57c18f98c777876a8054405d1428cc92e Status: Downloaded newer image for kubernetesui/dashboard:v2.3.1 docker.io/kubernetesui/dashboard:v2.3.1 |
Finally the dashboard pods were up and running:
[root@server1 ~]# kubectl get pods --namespace=kubernetes-dashboard NAME READY STATUS RESTARTS AGE dashboard-metrics-scraper-856586f554-lj429 1/1 Running 1 2d21h kubernetes-dashboard-67484c44f6-h6zwl 1/1 Running 1 2d21h |
Then accessing this dashboard from remote (my desktop running VirtualBox) has not been that simple. Firstly, as explained in official documentation, I have used kubectl -n kubernetes-dashboard edit service kubernetes-dashboard command to expose an external port (valid only in a development spirit) and found it with:
[root@server1 ~]# kubectl -n kubernetes-dashboard get pod NAME READY STATUS RESTARTS AGE dashboard-metrics-scraper-856586f554-lj429 1/1 Running 1 2d20h kubernetes-dashboard-67484c44f6-h6zwl 1/1 Running 1 2d20h [root@server1 ~]# kubectl -n kubernetes-dashboard get service kubernetes-dashboard NAME TYPE CLUSTER-IP EXTERNAL-IP PORT(S) AGE kubernetes-dashboard NodePort 10.110.133.71 <none> 443:30736/TCP 2d20h |
Accessing this url I get the login url, not in the form of user/account unfortunately so a bit more of work is required:

So let’s create this account to get its token and login:
[root@server1 ~]# cat << EOF > dashboard-adminuser.yaml > apiVersion: v1 > kind: ServiceAccount > metadata: > name: admin-user > namespace: kubernetes-dashboard > EOF [root@server1 ~]# kubectl apply -f dashboard-adminuser.yaml serviceaccount/admin-user created [root@server1 ~]# cat << EOF > dashboard-authorization-adminuser.yaml > apiVersion: rbac.authorization.k8s.io/v1 > kind: ClusterRoleBinding > metadata: > name: admin-user > roleRef: > apiGroup: rbac.authorization.k8s.io > kind: ClusterRole > name: cluster-admin > subjects: > - kind: ServiceAccount > name: admin-user > namespace: kubernetes-dashboard > EOF [root@server1 ~]# kubectl apply -f dashboard-authorization-adminuser.yaml clusterrolebinding.rbac.authorization.k8s.io/admin-user created [root@server1 ~]# kubectl get serviceaccounts --namespace=kubernetes-dashboard NAME SECRETS AGE admin-user 1 6m3s default 1 2d22h kubernetes-dashboard 1 2d22h [root@server1 ~]# kubectl -n kubernetes-dashboard get secret $(kubectl -n kubernetes-dashboard get sa/admin-user -o jsonpath="{.secrets[0].name}") -o go-template="{{.data.token | base64decode}}" eyJhbGciOiJSUzI1NiIsImtpZCI6IkhmUkV4c1BvSmZwSGZrdk5RdEw2LXBZYklEUWdTREpHZENXclBpRnktSEEifQ.eyJpc3MiOiJrdWJlcm5ldGVzL3NlcnZpY2VhY2NvdW50Iiwia3ViZXJuZXRlcy5pby9zZXJ2aWNlYWNjb3VudC9uYW1lc3BhY2UiOiJrdWJlcm5ldGVzLWRhc2hib2FyZCIsImt1YmVybmV0ZXMuaW8vc2VydmljZWFjY291bnQvc2VjcmV0Lm5hbWUiOiJhZG1pbi11c2VyLXRva2VuLWhkZ242Iiwia3ViZXJuZXRlcy5pby9zZXJ2aWNlYWNjb3VudC9zZXJ2aWNlLWFjY291bnQubmFtZSI6ImFkbWluLXVzZXIiLCJrdWJlcm5ldGVzLmlvL3NlcnZpY2VhY2NvdW50L3NlcnZpY2UtYWNjb3VudC51aWQiOiI3ZTA3ZTg3NS1lYzU1LTQ1YTEtODUwNy1hNzRlOWJjMjQ4M2MiLCJzdWIiOiJzeXN0ZW06c2VydmljZWFjY291bnQ6a3ViZXJuZXRlcy1kYXNoYm9hcmQ6YWRtaW4tdXNlciJ9.s79nHkqPi8wI3R131vKbvxzLW-N5Th6dsdEvQ8oCh31xIyjh5eOCWTFuG4Jyqra02Uu8CeHThh2SyjyRvJcMy948Oah1SIzyTmGwTxzOO0_hyYDNKCRlSYFbKqMqqKoGlaFoqTObi0-wYzgjrMmrIRMt6JYkm05fQgMVYaXBlUIZMbCx3uhBQKyZ270YQe5os1E_6yhNjI30w2SvpG6aVcrr1pDC-wT7aizJ42_oHx0ZB2REOcJhdUII1nCwF6Cd-kbfMN_kqkxLhi5AIHWGWINDoSAR89jR8-DVmd_ttG9Ou5dhiQ4anXYwcF3BhzQsZdZsY8aoEwxni-aLK9DqXQ |
By suppling the token I am finally able to connect:
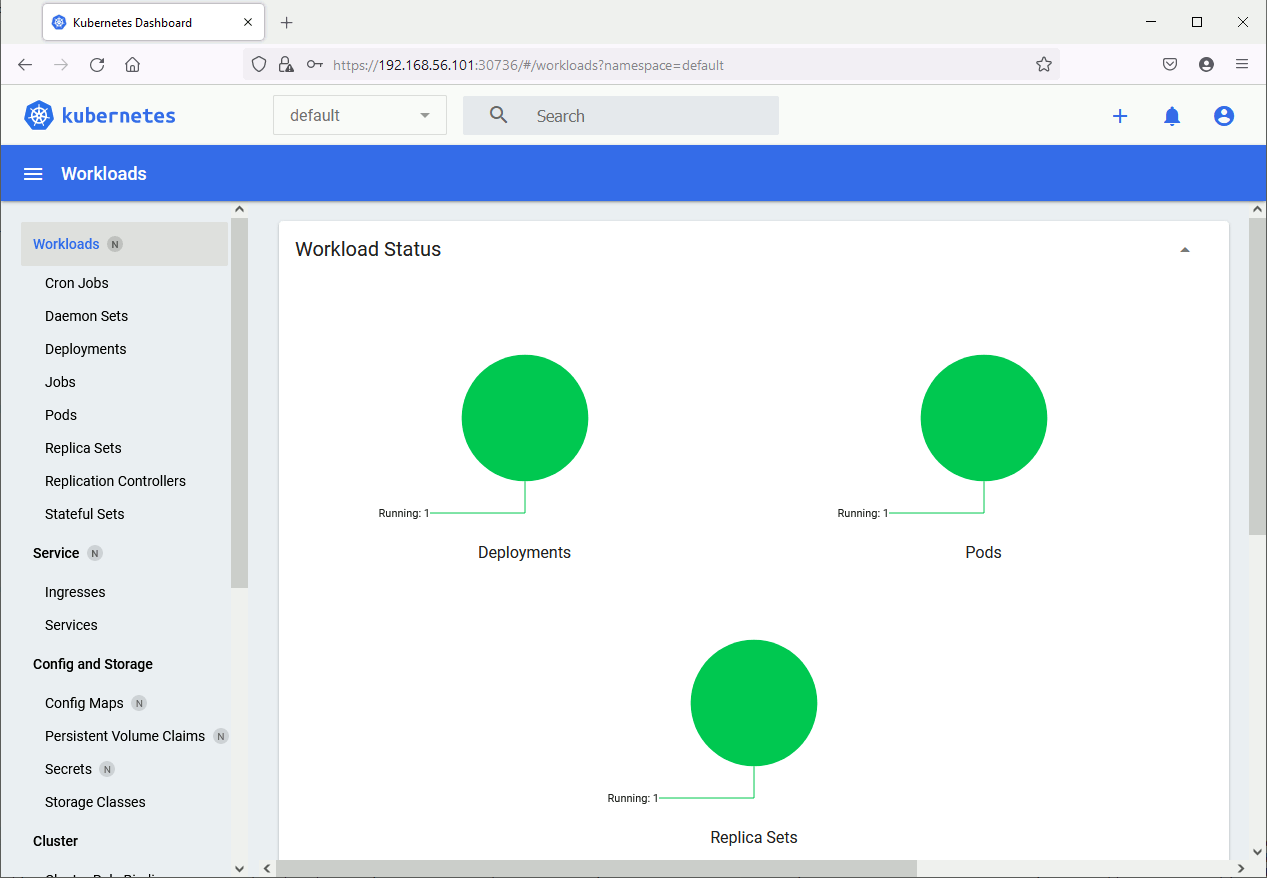
Add a node to a Kubernetes cluster
So far I have only the control-plane node in my cluster:
[root@server1 ~]# kubectl get nodes NAME STATUS ROLES AGE VERSION server1.domain.com Ready control-plane,master 3d1h v1.21.3 |
on my second node (server2.domain.com) I configure the Kubernetes, Docker repository and I install the same packages as on server1.domain.com. I have also obviously configured all the operating system requirements same as server1.domain.com. Finally issue the suggested kubeadm command:
[root@server2 ~]# export HTTPS_PROXY='http://proxy_account:proxy_password@proxy_server:proxy_port' [root@server2 ~]# export NO_PROXY=192.168.0.0/16,10.0.0.0/8 [root@server2 ~]# kubeadm join 192.168.56.101:6443 --token bbvzqr.z1201gns44iewbo8 --discovery-token-ca-cert-hash sha256:f8dbf9a512fe242b8b818b6528a43285ad8fc41612502a968a09907b8e5e78e7 [preflight] Running pre-flight checks error execution phase preflight: couldn't validate the identity of the API Server: could not find a JWS signature in the cluster-info ConfigMap for token ID "bbvzqr" To see the stack trace of this error execute with --v=5 or higher |
Unfortunately my token expired (by default, tokens expire after 24 hours) so had to recreate a new one on control-plane node:
[root@server1 ~]# kubeadm token list [root@server1 ~]# kubeadm token create w84q7r.6v9kttkhvj34mco5 [root@server1 ~]# kubeadm token list TOKEN TTL EXPIRES USAGES DESCRIPTION EXTRA GROUPS w84q7r.6v9kttkhvj34mco5 23h 2021-07-30T17:58:10+02:00 authentication,signing <none> system:bootstrappers:kubeadm:default-node-token [root@server1 ~]# openssl x509 -pubkey -in /etc/kubernetes/pki/ca.crt | openssl rsa -pubin -outform der 2>/dev/null | openssl dgst -sha256 -hex | sed 's/^.* //' f8dbf9a512fe242b8b818b6528a43285ad8fc41612502a968a09907b8e5e78e7 |
And this time it went well:
[root@server2 ~]# kubeadm join 192.168.56.101:6443 --token w84q7r.6v9kttkhvj34mco5 --discovery-token-ca-cert-hash sha256:f8dbf9a512fe242b8b818b6528a43285ad8fc41612502a968a09907b8e5e78e7 [preflight] Running pre-flight checks [preflight] Reading configuration from the cluster... [preflight] FYI: You can look at this config file with 'kubectl -n kube-system get cm kubeadm-config -o yaml' [kubelet-start] Writing kubelet configuration to file "/var/lib/kubelet/config.yaml" [kubelet-start] Writing kubelet environment file with flags to file "/var/lib/kubelet/kubeadm-flags.env" [kubelet-start] Starting the kubelet [kubelet-start] Waiting for the kubelet to perform the TLS Bootstrap... This node has joined the cluster: * Certificate signing request was sent to apiserver and a response was received. * The Kubelet was informed of the new secure connection details. Run 'kubectl get nodes' on the control-plane to see this node join the cluster. |
Node added and role has to be set manually from what I have read:
[root@server1 ~]# kubectl get nodes NAME STATUS ROLES AGE VERSION server1.domain.com Ready control-plane,master 3d2h v1.21.3 server2.domain.com NotReady <none> 35s v1.21.3 |
Or more verbose for nodes labels:
[root@server1 ~]# kubectl get nodes --show-labels NAME STATUS ROLES AGE VERSION LABELS server1.domain.com Ready control-plane,master 3d22h v1.21.3 beta.kubernetes.io/arch=amd64,beta.kubernetes.io/os=linux,kubernetes.io/arch=amd64,kubernetes.io/hostname=server1.domain.com,kubernetes.io/os=linux,node-role.kubernetes.io/control-plane=,node-role.kubernetes.io/master=,node.kubernetes.io/exclude-from-external-load-balancers= server2.domain.com Ready <none> 20h v1.21.3 beta.kubernetes.io/arch=amd64,beta.kubernetes.io/os=linux,kubernetes.io/arch=amd64,kubernetes.io/hostname=server2.domain.com,kubernetes.io/os=linux |
To change the label of freshly added node to worker (from what I have read there is no naming convention for nodes labels):
[root@server1 ~]# kubectl label node server2.domain.com node-role.kubernetes.io/worker= node/server2.domain.com labeled [root@server1 ~]# kubectl get nodes NAME STATUS ROLES AGE VERSION server1.domain.com Ready control-plane,master 3d22h v1.21.3 server2.domain.com Ready worker 20h v1.21.3 [root@server1 ~]# kubectl describe node server2.domain.com Name: server2.domain.com Roles: worker Labels: beta.kubernetes.io/arch=amd64 beta.kubernetes.io/os=linux kubernetes.io/arch=amd64 kubernetes.io/hostname=server2.domain.com kubernetes.io/os=linux node-role.kubernetes.io/worker= . . . |
Lots of system pods have been added:
[root@server1 ~]# kubectl get pods --all-namespaces -o wide NAMESPACE NAME READY STATUS RESTARTS AGE IP NODE NOMINATED NODE READINESS GATES default nginx-6799fc88d8-jk727 0/1 ContainerCreating 0 19m <none> server2.domain.com <none> <none> kube-system coredns-78fcd69978-8mtv9 1/1 Running 0 111m 192.168.55.3 server1.domain.com <none> <none> kube-system coredns-78fcd69978-d5vpz 1/1 Running 0 111m 192.168.55.2 server1.domain.com <none> <none> kube-system etcd-server1.domain.com 1/1 Running 2 111m 192.168.56.101 server1.domain.com <none> <none> kube-system kube-apiserver-server1.domain.com 1/1 Running 0 111m 192.168.56.101 server1.domain.com <none> <none> kube-system kube-controller-manager-server1.domain.com 1/1 Running 0 111m 192.168.56.101 server1.domain.com <none> <none> kube-system kube-flannel-ds-2922x 0/1 CrashLoopBackOff 21 (2m51s ago) 87m 192.168.56.102 server2.domain.com <none> <none> kube-system kube-flannel-ds-4lpk4 1/1 Running 0 110m 192.168.56.101 server1.domain.com <none> <none> kube-system kube-proxy-9c2pr 1/1 Running 0 111m 192.168.56.101 server1.domain.com <none> <none> kube-system kube-proxy-9p268 1/1 Running 0 87m 192.168.56.102 server2.domain.com <none> <none> kube-system kube-scheduler-server1.domain.com 1/1 Running 0 111m 192.168.56.101 server1.domain.com <none> <none> kubernetes-dashboard dashboard-metrics-scraper-856586f554-mwwzw 1/1 Running 0 109m 192.168.55.5 server1.domain.com <none> <none> kubernetes-dashboard kubernetes-dashboard-67484c44f6-ggvj8 1/1 Running 0 109m 192.168.55.4 server1.domain.com <none> <none> |
The Flannel container is not able to start on newly added node, this is apparently a bug:
[root@server1 ~]# kubectl -n kube-system logs -p kube-flannel-ds-7hr6x I1008 09:59:16.295218 1 main.go:520] Determining IP address of default interface I1008 09:59:16.296819 1 main.go:533] Using interface with name enp0s8 and address 10.70.101.44 I1008 09:59:16.296883 1 main.go:550] Defaulting external address to interface address (10.70.101.44) W1008 09:59:16.296945 1 client_config.go:608] Neither --kubeconfig nor --master was specified. Using the inClusterConfig. This might not work. I1008 09:59:17.400125 1 kube.go:116] Waiting 10m0s for node controller to sync I1008 09:59:17.400262 1 kube.go:299] Starting kube subnet manager I1008 09:59:18.400588 1 kube.go:123] Node controller sync successful I1008 09:59:18.400644 1 main.go:254] Created subnet manager: Kubernetes Subnet Manager - server2.domain.com I1008 09:59:18.400670 1 main.go:257] Installing signal handlers I1008 09:59:18.401529 1 main.go:392] Found network config - Backend type: vxlan I1008 09:59:18.401704 1 vxlan.go:123] VXLAN config: VNI=1 Port=0 GBP=false Learning=false DirectRouting=false E1008 09:59:18.402563 1 main.go:293] Error registering network: failed to acquire lease: node "server2.domain.com" pod cidr not assigned I1008 09:59:18.403201 1 main.go:372] Stopping shutdownHandler... |
Solved it with:
[root@server1 ~]# kubectl get nodes -o jsonpath='{.items[*].spec.podCIDR}' 192.168.55.0/24 [root@server1 ~]# kubectl patch node server2.domain.com -p '{"spec":{"podCIDR":"192.168.55.0/24"}}' node/server2.domain.com patched [root@server1 ~]# kubectl get pods --all-namespaces -o wide NAMESPACE NAME READY STATUS RESTARTS AGE IP NODE NOMINATED NODE READINESS GATES kube-system coredns-78fcd69978-8mtv9 1/1 Running 0 20h 192.168.55.3 server1.domain.com <none> <none> kube-system coredns-78fcd69978-d5vpz 1/1 Running 0 20h 192.168.55.2 server1.domain.com <none> <none> kube-system etcd-server1.domain.com 1/1 Running 2 20h 192.168.56.101 server1.domain.com <none> <none> kube-system kube-apiserver-server1.domain.com 1/1 Running 0 20h 192.168.56.101 server1.domain.com <none> <none> kube-system kube-controller-manager-server1.domain.com 1/1 Running 0 20h 192.168.56.101 server1.domain.com <none> <none> kube-system kube-flannel-ds-4lpk4 1/1 Running 0 20h 192.168.56.101 server1.domain.com <none> <none> kube-system kube-flannel-ds-7hr6x 1/1 Running 8 (11m ago) 22m 192.168.56.102 server2.domain.com <none> <none> kube-system kube-proxy-86rws 1/1 Running 0 22m 192.168.56.102 server2.domain.com <none> <none> kube-system kube-proxy-9c2pr 1/1 Running 0 20h 192.168.56.101 server1.domain.com <none> <none> kube-system kube-scheduler-server1.domain.com 1/1 Running 0 20h 192.168.56.101 server1.domain.com <none> <none> kubernetes-dashboard dashboard-metrics-scraper-856586f554-mwwzw 1/1 Running 0 20h 192.168.55.5 server1.domain.com <none> <none> kubernetes-dashboard kubernetes-dashboard-67484c44f6-ggvj8 1/1 Running 0 20h 192.168.55.4 server1.domain.com <none> <none> |
To remove this node from the cluster use:
[root@server1 ~]# kubectl delete node server2.domain.com node "server2.domain.com" deleted |
Useful commands to debug container issues
List of commands that give containers status as well as container logs:
kubectl get pods --all-namespaces -o wide kubectl -n kube-system describe pod kube-flannel-ds-2922x kubectl -n kube-system logs -p kube-flannel-ds-2922x |
References
- World domination with cgroups in RHEL 8: welcome cgroups v2!
- Docker : Install Docker on Oracle Linux 8 (OL8)
- The differences between Docker, containerd, CRI-O and runc
- Docker and Proxy
- Setting Up a Kubernetes Cluster on virtual machines
- How to install Kubernetes cluster on CentOS 8
")


")
