Table of contents
Preamble
When testing Connector/J with MySQL replication I have been quite disappointed by failover capabilities and when discussing with SkySQL support and reading a bit on Internet I reached the conclusion that I had to put a new component in my infrastructure to be really able to benefit from MySQL replication high availability at application level.
At this stage either you put n expensive hardware like a F5 box or a software equivalence. I have chosen to test one of the most famous, that is free by the way, called HAProxy !
This blog post has been written using MySQL 5.6.15 and HAProxy 1.4.24 running on Oracle Linux Server release 6.5. My server list is the following:
- server1.domain.com for MySQL master server using 192.168.56.101 non-routable IP address
- server2.domain.com for MySQL slave server using 192.168.56.102 non-routable IP address
- server3.domain.com for HAProxy server using 192.168.56.103 and 192.168.56.104 non-routable IP addresses
HAProxy installation
As usual when installing those kind of open source product either you start from the source or a executable or from the repository of your Linux distribution:
[root@server3 ~]# yum list haproxy Loaded plugins: security Installed Packages haproxy.x86_64 1.4.24-2.el6 @public_ol6_latest |
My HAProxy server has IP address 192.168.56.103, I need a second one to have a dedicated IP for writes and a dedicated one for reads (so 192.168.56.104). Naming convention is to increment current interface name with : and a number i.e. eth1:0, eth1:1. So in /etc/sysconfig/network-scripts I create ifcfg-eth1:0 (inherited from ifcfg-eth1 except for IP address) below script (eth1 interface handle my non routing IPs):
DEVICE=eth1:0 HWADDR=08:00:27:2a:c3:94 TYPE=Ethernet UUID=b3ddb46f-ced0-4905-a0f4-888ebca9e8c3 ONBOOT=yes NM_CONTROLLED=yes BOOTPROTO=none IPADDR=192.168.56.104 NETMASK=255.255.255.0 IPV6INIT=no USERCTL=no |
To validate new configuration use service network restart. You should see something like:
[root@server3 haproxy]# ifconfig eth0 Link encap:Ethernet HWaddr 08:00:27:7E:10:D4 inet addr:10.0.2.15 Bcast:10.0.2.255 Mask:255.255.255.0 inet6 addr: fe80::a00:27ff:fe7e:10d4/64 Scope:Link UP BROADCAST RUNNING MULTICAST MTU:1500 Metric:1 RX packets:3 errors:0 dropped:0 overruns:0 frame:0 TX packets:13 errors:0 dropped:0 overruns:0 carrier:0 collisions:0 txqueuelen:1000 RX bytes:794 (794.0 b) TX bytes:1255 (1.2 KiB) eth1 Link encap:Ethernet HWaddr 08:00:27:2A:C3:94 inet addr:192.168.56.103 Bcast:192.168.56.255 Mask:255.255.255.0 inet6 addr: fe80::a00:27ff:fe2a:c394/64 Scope:Link UP BROADCAST RUNNING MULTICAST MTU:1500 Metric:1 RX packets:351 errors:0 dropped:0 overruns:0 frame:0 TX packets:325 errors:0 dropped:0 overruns:0 carrier:0 collisions:0 txqueuelen:1000 RX bytes:33634 (32.8 KiB) TX bytes:41357 (40.3 KiB) eth1:0 Link encap:Ethernet HWaddr 08:00:27:2A:C3:94 inet addr:192.168.56.104 Bcast:192.168.56.255 Mask:255.255.255.0 UP BROADCAST RUNNING MULTICAST MTU:1500 Metric:1 lo Link encap:Local Loopback inet addr:127.0.0.1 Mask:255.0.0.0 inet6 addr: ::1/128 Scope:Host UP LOOPBACK RUNNING MTU:65536 Metric:1 RX packets:0 errors:0 dropped:0 overruns:0 frame:0 TX packets:0 errors:0 dropped:0 overruns:0 carrier:0 collisions:0 txqueuelen:0 RX bytes:0 (0.0 b) TX bytes:0 (0.0 b) |
Configuration
As I plan to use the mysql-check option (Use for MySQL health checks server testing) I need the MySQL client on my HAProxy server, for this simply take the old release that comes with my Linux distribution:
[root@server3 etc]# yum -y install mysql.x86_64 Loaded plugins: security Setting up Install Process Resolving Dependencies --> Running transaction check ---> Package mysql.x86_64 0:5.1.71-1.el6 will be installed --> Finished Dependency Resolution Dependencies Resolved =============================================================================================================================================================================================================== Package Arch Version Repository Size =============================================================================================================================================================================================================== Installing: mysql x86_64 5.1.71-1.el6 public_ol6_latest 893 k Transaction Summary =============================================================================================================================================================================================================== Install 1 Package(s) Total download size: 893 k Installed size: 2.4 M Downloading Packages: mysql-5.1.71-1.el6.x86_64.rpm | 893 kB 00:01 Running rpm_check_debug Running Transaction Test Transaction Test Succeeded Running Transaction Warning: RPMDB altered outside of yum. Installing : mysql-5.1.71-1.el6.x86_64 1/1 Verifying : mysql-5.1.71-1.el6.x86_64 1/1 Installed: mysql.x86_64 0:5.1.71-1.el6 Complete! |
Create a dedicated HAProxy monitoring account On all MySQL servers (if using MySQL replication the command should be replicated from master to all slaves):
mysql> create user 'haproxy_check'@'192.168.56.103'; Query OK, 0 rows affected (0.01 sec) mysql> flush privileges; Query OK, 0 rows affected (0.00 sec) |
Remark:
This account does not need any privileges and certainly not the SUPER USER privileges like I have seen on some web sites. Moreover as this account is password less giving highest privilege to it is a very very bad security idea.
I inherited the default HAProxy configuration and added my own configuration options:
[root@server3 haproxy]# cat haproxy.cfg #--------------------------------------------------------------------- # Example configuration for a possible web application. See the # full configuration options online. # # http://haproxy.1wt.eu/download/1.4/doc/configuration.txt # #--------------------------------------------------------------------- #--------------------------------------------------------------------- # Global settings #--------------------------------------------------------------------- global # to have these messages end up in /var/log/haproxy.log you will # need to: # # 1) configure syslog to accept network log events. This is done # by adding the '-r' option to the SYSLOGD_OPTIONS in # /etc/sysconfig/syslog # # 2) configure local2 events to go to the /var/log/haproxy.log # file. A line like the following can be added to # /etc/sysconfig/syslog # # local2.* /var/log/haproxy.log # log 127.0.0.1 local2 chroot /var/lib/haproxy pidfile /var/run/haproxy.pid maxconn 4000 user haproxy group haproxy daemon # turn on stats unix socket stats socket /var/lib/haproxy/stats #--------------------------------------------------------------------- # common defaults that all the 'listen' and 'backend' sections will # use if not designated in their block #--------------------------------------------------------------------- defaults mode http log global option httplog option dontlognull # option http-server-close # option forwardfor except 127.0.0.0/8 option redispatch retries 3 timeout http-request 10s timeout queue 1m timeout connect 10s timeout client 1m timeout server 1m timeout http-keep-alive 10s timeout check 10s maxconn 3000 #--------------------------------------------------------------------- # MySQL read-write server #--------------------------------------------------------------------- frontend mysql_write mode tcp bind 192.168.56.103:3316 default_backend cluster_db_write #--------------------------------------------------------------------- # MySQL read-only server #--------------------------------------------------------------------- frontend mysql_read mode tcp bind 192.168.56.104:3316 default_backend cluster_db_read #--------------------------------------------------------------------- # MySQL read-write cluster #--------------------------------------------------------------------- backend cluster_db_write mode tcp option tcpka option mysql-check user haproxy_check balance roundrobin server Node1 192.168.56.101:3316 check server Node2 192.168.56.102:3316 check backup #--------------------------------------------------------------------- # MySQL read-only cluster #--------------------------------------------------------------------- backend cluster_db_read mode tcp option tcpka option mysql-check user haproxy_check balance roundrobin server Node2 192.168.56.102:3316 check server Node1 192.168.56.101:3316 check backup #--------------------------------------------------------------------- # Http listen port for graphical status #--------------------------------------------------------------------- listen stats *:8080 mode http option httpclose balance roundrobin stats uri / stats realm Haproxy\ Statistics stats auth admin:admin |
Notes:
- I have two front ends (mysql_write and mysql_read) for read-write and read-only queries respectively listening on IP address 192.168.56.103, port 3316 and IP address 192.168.56.104, port 3316
- each fronted is using a backend called cluster_db_write and cluster_db_read. For cluster_db_write MySQL master server (server1.domain.com) is main server and MySQL slave server (server2.domain.com) act as a backup server (the slave promotion has to be done externally and is obviously not manage by HAProxy). For cluster_db_read MySQL slave server (server2.domain.com) is main server and MySQL master server (server1.domain.com) act as a backup server (in case of slave down MySQL master server will also server read-only queries)
We can finally start HAPRoxy with:
[root@server3 ~]# service haproxy start Starting haproxy: [ OK ] |
You can confirm all is fine with:
[root@server3 ~]# service haproxy status haproxy (pid 12650) is running... [root@server3 ~]# ps -ef | grep haproxy |grep -v grep haproxy 12650 1 0 12:36 ? 00:00:18 /usr/sbin/haproxy -D -f /etc/haproxy/haproxy.cfg -p /var/run/haproxy.pid [root@server3 haproxy]# netstat -an |grep LISTEN | grep 3316 tcp 0 0 192.168.56.104:3316 0.0.0.0:* LISTEN tcp 0 0 192.168.56.103:3316 0.0.0.0:* LISTEN |
Testing
I’m almost using the same Java code like when testing Connector/J with MySQL replication:
package jdbcdemo1; import com.mysql.jdbc.Driver; import java.sql.ResultSet; import java.util.Properties; import java.sql.Connection; import java.sql.SQLException; public class jdbcdemo1 { public static void main(String[] args) throws Exception { Driver driver = new Driver(); Properties props = new Properties(); ResultSet rs; String variable_value; Connection conn = null; String JDBC_URL = "jdbc:mysql:replication://address=(protocol=tcp)(host=192.168.56.103)(port=3316)(type=master)," + "address=(protocol=tcp)(host=192.168.56.104)(port=3316)(type=slave)"; props.put("user", "yjaquier"); props.put("password", "secure_password"); System.out.println("\n------------ MySQL Connector/J and MySQL Replication Testing ------------\n"); try { Class.forName("com.mysql.jdbc.ReplicationDriver"); } catch (ClassNotFoundException e) { System.out.println("Where is your MySQL JDBC Driver?"); e.printStackTrace(); return; } System.out.println("MySQL Connector/J driver loaded"); for(int i=1; i <= 1000; i++) { System.out.println("Trying connection..."); try { conn = driver.connect(JDBC_URL, props); } catch (SQLException e) { System.out.println("Connection Failed! Check output console"); System.out.println("Error cause: "+e.getCause()); System.out.println("Error message: "+e.getMessage()); return; } System.out.println("Connection established..."); System.out.println("\nQuery "+i+": "); // Fake Read Write SQL statement (just to see where it goes) System.out.println("Read Write query..."); try { conn.setReadOnly(false); } catch (SQLException e) { System.out.println("Connection read write property set has has failed..."); } try { rs = conn.createStatement().executeQuery("SELECT variable_value FROM information_schema.global_variables where variable_name='hostname'"); while (rs.next()) { variable_value = rs.getString("variable_value"); System.out.println("variable_value : " + variable_value); } } catch (SQLException e) { System.out.println("Read/write query has failed..."); //System.out.println("Error cause: "+e.getCause()); //System.out.println("Error message: "+e.getMessage()); } // Read Only statement System.out.println("Read Only query..."); try { conn.setReadOnly(true); } catch (SQLException e) { System.out.println("Connection read only property set has has failed..."); } try { rs = conn.createStatement().executeQuery("SELECT variable_value FROM information_schema.global_variables where variable_name='hostname'"); while (rs.next()) { variable_value = rs.getString("variable_value"); System.out.println("variable_value : " + variable_value); } } catch (SQLException e) { System.out.println("Read only query has failed..."); } conn.close(); Thread.sleep(2000); } } } |
Except that I close the connection (conn.close()) and initiate a new one at each loop (conn = driver.connect(JDBC_URL, props)). I have spent almost one day on this but if you don’t do it then Connector/J is moving, for example, the read-only queries to server1.domain.com if server2.domain.com is down but when server2.domain.com is back to life Connector/J is never using server2.domain.com anymore till you do not close and re-initiate the connection… Without I can explain why…
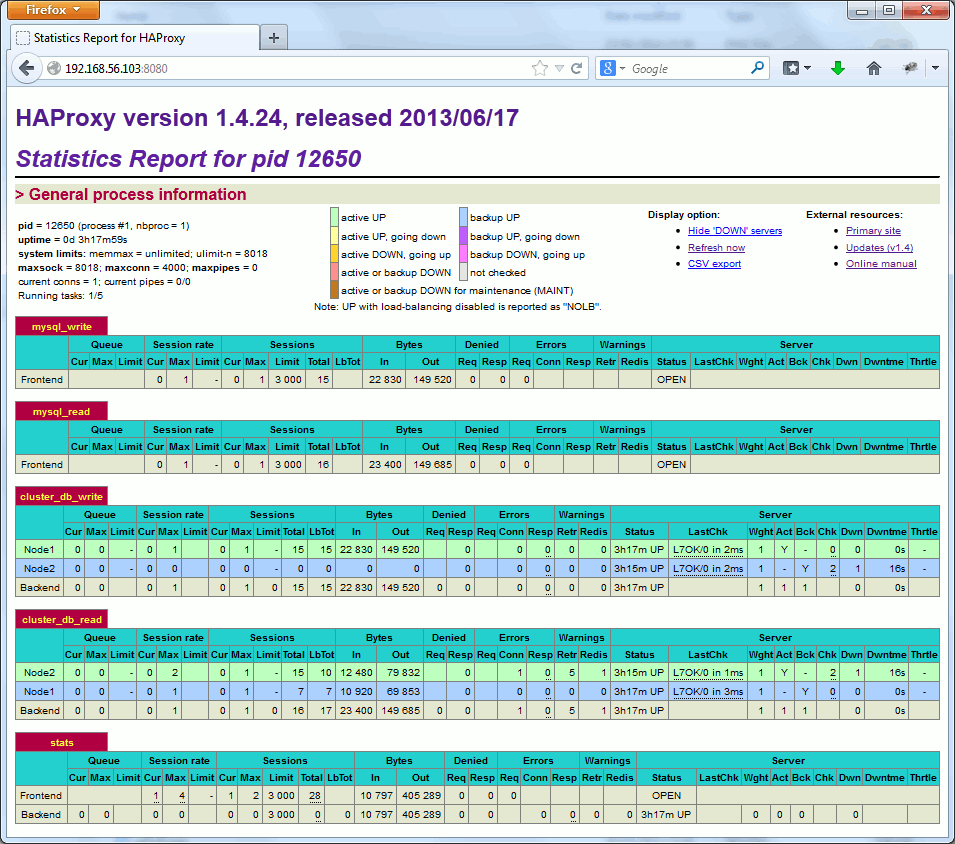
All the failover scenario, MySQL master server down or MySQL slave server down are working very well. When all servers are up and running the status http page (server3.domain.com:8080) is giving:

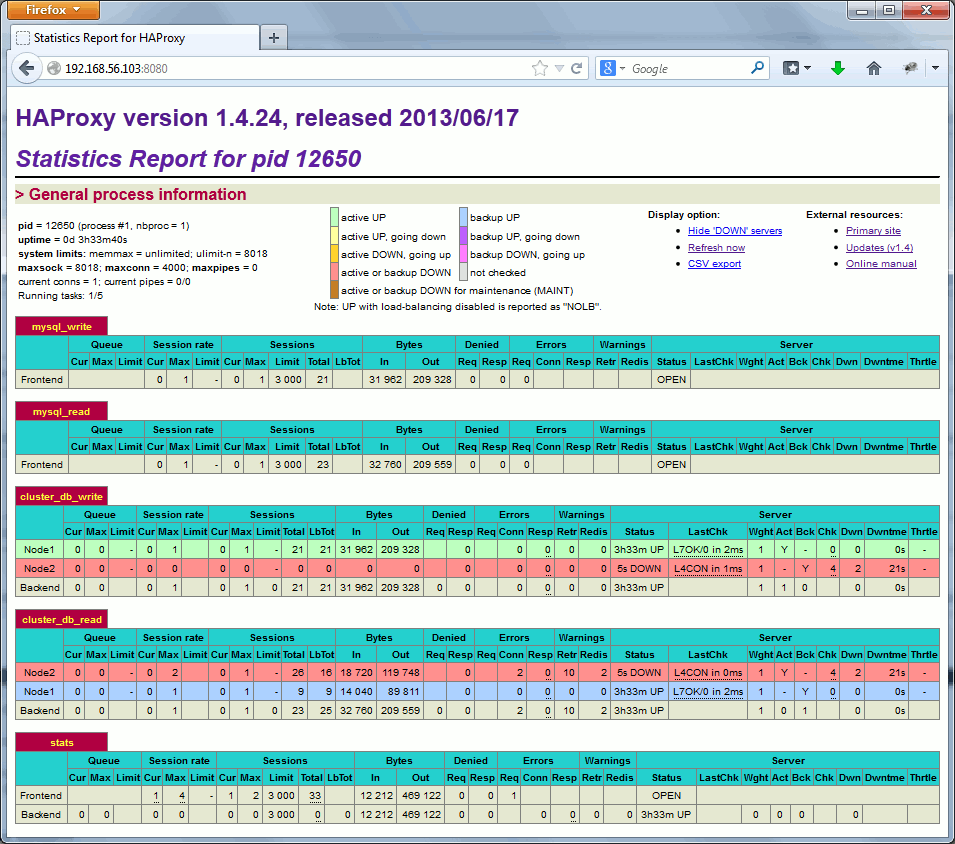
If, for example, MySQL slave server is down (server2.domain.com), then in this case read-only queries are automatically redirected to MySQL master server (server1.domain.com) and HAProxy status page gives:

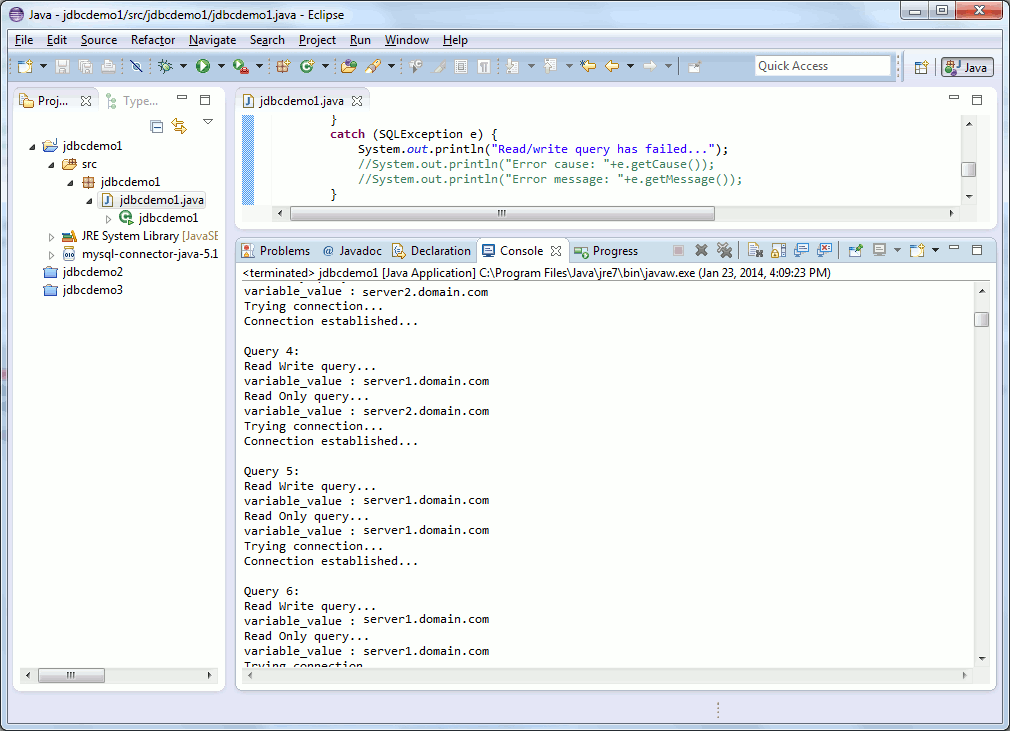
From my Eclipse Java project it is transparently managed, thanks to HAProxy:

References
- HAProxy
- How To Use HAProxy to Set Up MySQL Load Balancing
- MySQL DB Load Balancing with HAProxy
- Fail Over MySQL with HAProxy


Arjun says:
Great article
Yannick Jaquier says:
Thanks for nice comment.
Arjun says:
Hi.i want to use haproxy to loadbalance mysql database with one master and a slave.Currently,my application uses eclipse with tomcat to listen to master database,specifying the ipaddress and hostname,along with username,password and name of database.How do i change my configuration to allow jdbc to connect to haproxy load balancer directly to distribute queries??
Yannick Jaquier says:
Hi,
This is probably in the source code of your application. Please refer to other articles I have written around Connector/J. This one for example:
http://blog.yannickjaquier.com/mysql/connectorj-with-mysql-replication.html
Thanks, Yannick.
Arjun says:
Hi,the problem is i need to change my configuration such that the application will listen to server with haproxy,to forward it to master and slave.
192.168.x.M:3306=master ip address and port
192.168.x.S:3306=slave ip address and port
192.168.x.H:3306=haproxy load balancer ip address and port
The present context.xml file looks like
But the haproxy load balancer server will not have the database in it.All permissions have been granted in the master mysql.So how do I make the application listen to loadbalancer server instead of master or slave??
Thanks in advance.Your posts are very clear and informative
Yannick Jaquier says:
Hi,
Please re-read my post all is well explained in it. You need two IP addresses on your HAProxy host. One for read/write and one for read/only.
Thanks, Yannick.